Herbs bring immense flavor and fragrance to everyday meals, their goodness amplified directly from the garden. While limited yard space or poor soil prohibits outdoor herb gardening for many, indoor hydroponic growing systems now make homegrown herbs possible nearly anywhere.
Learn how water-based hydroponics properly nourishes herbs’ growth needs for optimal health and productivity. We outline recommendations for lighting, tent setups, system types, nutrition balancing and maintenance tips suited to popular culinary herbs.
Why Herbs are Well-Suited for Hydroponic Cultivation?

Many popular culinary herbs possess traits that make them exceptionally compatible with soilless hydroponic growing methods. Understanding a herb’s natural tendencies can determine whether it thrives under controlled indoor environments.
Herbs such as basil, chives, cilantro, dill, mint, oregano, parsley, rosemary and thyme all respond positively to hydroponic cultivation. The majority of these plants prefer dry growing conditions with lower humidity. Their shallow root structures adapt suitably to containment in smaller hydro systems, compared to vegetables needing more anchoring material.
Most culinary herbs originate from rugged Mediterranean regions and mountainous areas. They have evolved robust survival mechanisms to withstand droughts, intense sun exposure and varying climates. Once transplanted indoors, heritage plants like Greek oregano and Tuscan basil transition smoothly under precision lighting and irrigation.
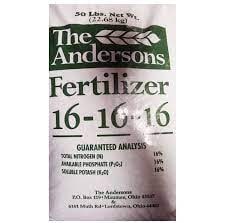
Many herbs contain higher essential oil concentrations in their leaves, flowers and stems. The hydroponic advantage allows fine-tuning nutritional balances to emphasize flavor and aromatic compounds. Growers cater higher levels of key elements like potassium, phosphorus, sulfur and nitrogen which herbs uptake for enhanced tastes and perfumes.
Additionally, the controlled settings guard sensitive herbs from temperature swings and pests while accelerating maturation rates to harvest faster than soil growing. Simply keeping indoor factors optimal at all times lets herbs focus energies on vigorous growth. The natural resilience and heartiness of most herbs exhibit combines with the protection and optimization, hydroponic systems provide for abundantly flourishing gardens year-round.
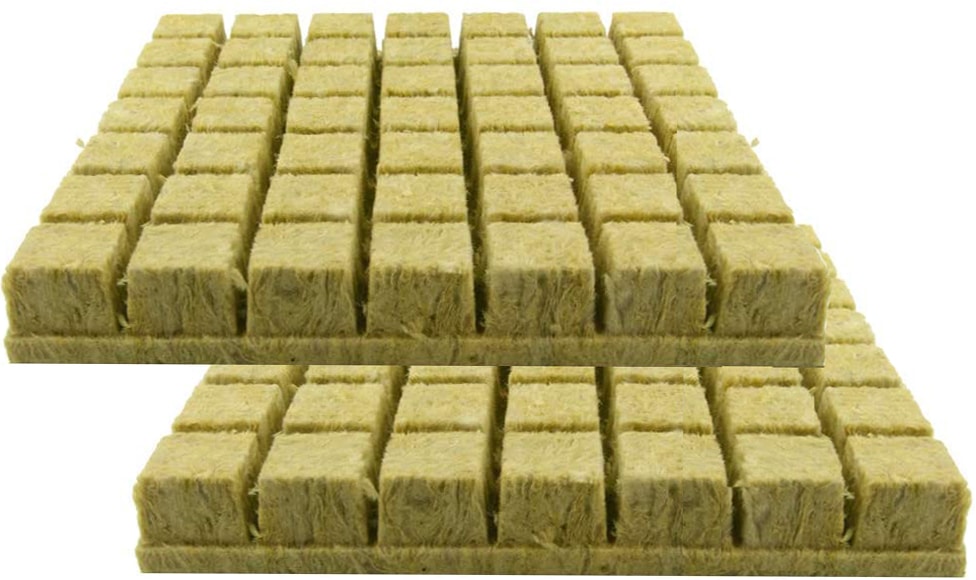
- 2 Sheets of 49 Plugs (98 Plugs Total)
- Twin Canaries Chart
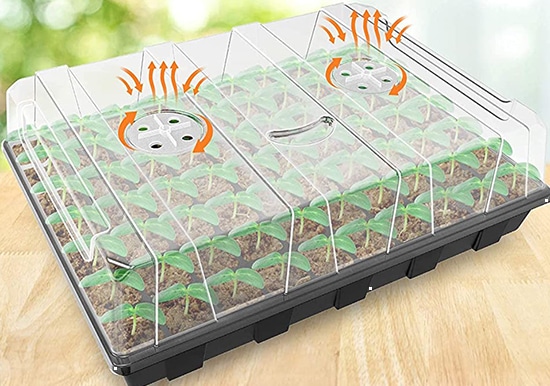
- Capacity for absorbing nutrient solution, retaining plenty of oxygen
Hydroponic Herb Garden Advantages
Transitioning from traditional herb gardening to hydroponic cultivation opens doors to game-changing benefits. By utilizing precise nutrient solutions instead of soil, home growers gain access to superior plant health, exponential yields, resource efficiency and streamlined caretaking. The controlled and optimized nature of hydroponics eliminates challenges faced when attempting to grow temperamental herbs outdoors.
- Controlled Environment. The self-contained nature of hydroponics allows precision control over lighting, temperature, humidity and other factors. Set the perfect levels optimized for each herb’s ideal needs in order to grow more vigorously. From warmth demanding basil to humidity-sensitive Mediterranean herbs, dial in customized conditions.
- Increased Yield. Ditching dirt for nutrient solution growing leads to exponential increases in plant productivity and harvest sizes. Properly formulated hydroponic systems furnish exact mineral ratios herbs crave. Abundant food and water nearly eliminates stresses that hinder soil-grown plants.
- Soilless solutions use 10 times less water than conventional gardens thanks to recirculating designs. No water ever gets wasted. Fertilizer concentrations get continually monitored and replenished as plants consume them. Plus, integration with alternative energy like solar or wind offsets electrical costs.
- Pest and Disease Resistance. Hydroponic setups utilize sterile reservoirs, liners and inert growing media to prevent pathogen accumulation that plague soil gardens. Herbs grown in individual containers or separate nutrient film channels avoids contamination between plants. The protected environment resists insects, bacteria, fungi and viruses for healthier, safer herb consumption.
- Lower Maintenance. Precise measurements take the guesswork out of feeding schedules compared to amending outdoor soils. Indoor conditions rule out weed removal or excessive pruning requirements. Only refilling reservoirs and changing nutrient solutions requires attention every few weeks, freeing up time otherwise wasted on chores.
- Space Efficient. Vertical designs and tiered stacking take advantage of vertical real estate to produce abundant herbs, even in apartments or on balconies and patios with minimal square footage. No expansive garden beds needed!
- Less Labor Intensive. The contained nature avoids heavy digging, double handling of soil, weeding and constant moisture monitoring associated with in-ground planting. Simply set up a system once for recurring harvests rather than annual soil preps. Automated hydroponics reduces daily efforts to just a few minutes.
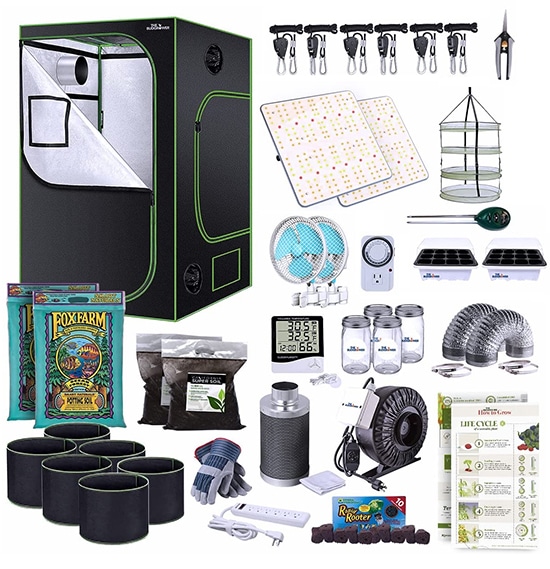
- LED lights specialty manufactured by VIVOSUN with Samsung LM301 diodes for FULL spectrum light
- The industries most durable grow tent – heavy duty 1680d oxford cloth
- Money & energy saving complete home grow tent kit
What Herbs Grow Well in Hydroponics System?
When embarking on hydroponic gardening, herb growers rightfully wonder which plants suit the best the transition from soil to water based cultivation. Numerous popular culinary herbs share traits that allow them to positively thrive under optimized indoor conditions. Their aromatic leaves, resilience to variability and modest sizing flourish in hydroponic systems that cater to supporting abundant growth.
Luckily for cooks seeking ultra-fresh flavor enhancements, many staple herbs grow extraordinarily well hydroponically:
- Basil. The undisputed king of herbs for rich, aromatic flavor thrives hydroponically. The customizable control caters to basil’s preferences for warm temperatures and high humidity. Grow prolific bushes of Genovese, Thai, lemon or other exotic basil varieties perfect for pesto sauces, sandwiches, pizza and more!
- Mint. Hardy mint plants adapt excellently to water culture methods. Contain their aggressive spreading nature by isolating mint in individual net pot containers separated from stealing nutrients from nearby plants. The compact roots derive intense spearmint, peppermint overtones under hydroponics.
- Thyme. Drought-resistant Mediterranean thyme needs only moderate humidity and flourishes under grow lights. Delivers pleasantly pungent, slightly lemony notes to season soups, meat and vegetable dishes.
- Tarragon. The anise-tinged herb bolts fast under heat and cold stress, making consistent indoor hydroponics ideal. Tarragon’s smaller roots suit NFT channels well. The licorice-like flavor enhances chicken, fish and vinegar mixtures.
- Oregano. Whether pungent Greek or mellower Italian types, oregano’s small roots thrive in ebb and flow or drip systems. Intensify zesty, savory, earthy oregano flavors essential for Italian cuisine with higher potassium and phosphorous levels.
- Chives. This perennial onion/garlic alternative generates upright green hollow leaves perfect for garnishing baked potatoes or flavoring dips. The grassy disks propagate easily when divided. Chives grow modestly sized root zones that never get too unruly for small hydro setups.
- Base 18
- Propagating to catch the excess water that drains from seed trays
- Keep Seeds Grow Healthy
What’s the Best Hydroponic Method for Growing Herbs?
The most suitable hydroponic system for cultivating flavorful, vigorous herbs depends on your level of experience and available time for maintenance. While all hydroponic techniques deliver improved herb growth over soil, some methods are better tailored to a herb garden’s modest space and nutrient needs:
- Deep Water Culture (DWC). DWC involves suspending plant roots in an oxygenated nutrient solution. Herbs are supported in inert grow media like clay pebbles in a bucket or tub. It’s one of the easiest hydroponic techniques for beginners since no spraying or runoff collection is needed. DWC provides consistent moisture and nutrients, though requires electricity for the air pump.
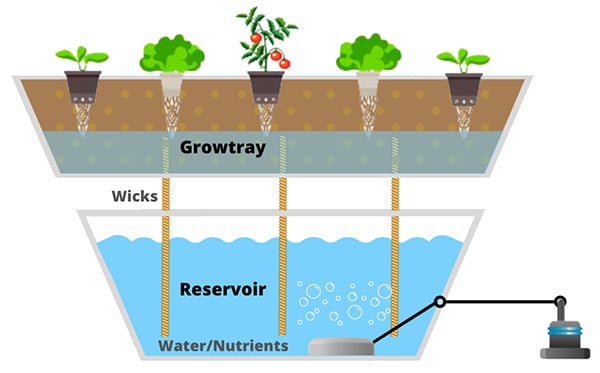
- Wick System. A wick system transports nutrients to plant roots through capillary action, no power required. Nylon ropes or cotton wicks hang from a reservoir into a clay pebble, perlite or coir-filled growing container. Wicks systems work well for larger leafy herbs like basil or mint that need lots of water. Just ensure wicks make good contact with the solution to function properly.
- Ebb and Flow (Flood and Drain). In ebb and flow, plants sit in an empty tray that floods with nutrient solution from a reservoir multiple times per day. The tray then drains back completely in a continual cycle. A timer automates the flooding schedule, providing moisture then oxygen to roots. Medium like grow rocks suits ebb and flow well given their air pockets.
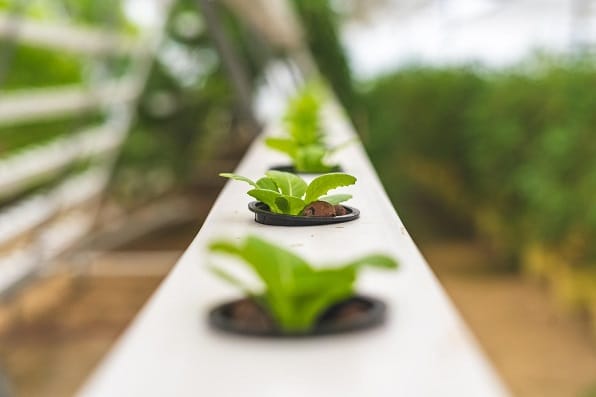
- Nutrient Film Technique (NFT). In NFT systems, a very shallow stream of nutrient water keeps roots consistently moist. Plants sit in slots pierced into growing channels, bare roots exposed to solutions and air. NFT’s need precise control over flow rate and height for the solution film, demanding more botany skills. Fast herb growth can be achieved if mastered.
- Drip or Top-Feed System. As their name implies, drip systems feed plants from above, automatically dispensing nutrient solution. Flexible tubing or emitters release nutrients bit-by-bit straight to growing media. Timers control durations and frequency, allowing customization per plant. They work efficiently using less water than some methods.
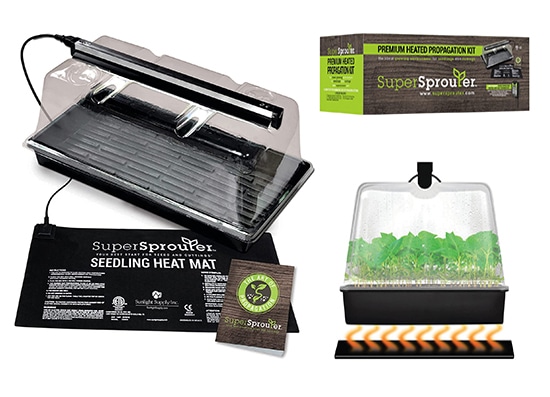
- Dome & T5 Light, 5 Piece, Black/Clear
- Art of Propagation booklet with expert advice for starting seedlings and cuttings
- Super Sprouter Seedling Heat Mat 10 in x 21 in is ETL listed
How to Start an Indoor Hydroponic Herb Garden
Embarking on indoor hydroponic herb gardening follows a clear process from variety selection and equipment setup to transplanting seedlings into systems for flourishing growth.
Selecting Herb Varieties
When choosing which delicious and aromatic herbs to grow hydroponically, consider year-round staples that enhance many meals. Classic options like Genovese basil, curly parsley, dill, mint and chives translate wonderfully from outdoor gardens to indoor water culture. Grow familiar favorites or explore more unique varieties like lemon basil, rosemary, thyme and cilantro suited to regional dishes.
Research growth specifics like mature sizes, flowering requirements and preferred temperatures for selecting the optimal hydroponic system to sustain each herb at peak health. A small ebb and flow kit nurtures a dozen sprigs of differed herbs, while larger Dutch bucket designs host voluminous basil bushes. Have contingencies if wanting to pollinate flowering basil or cilantro over wintertime.
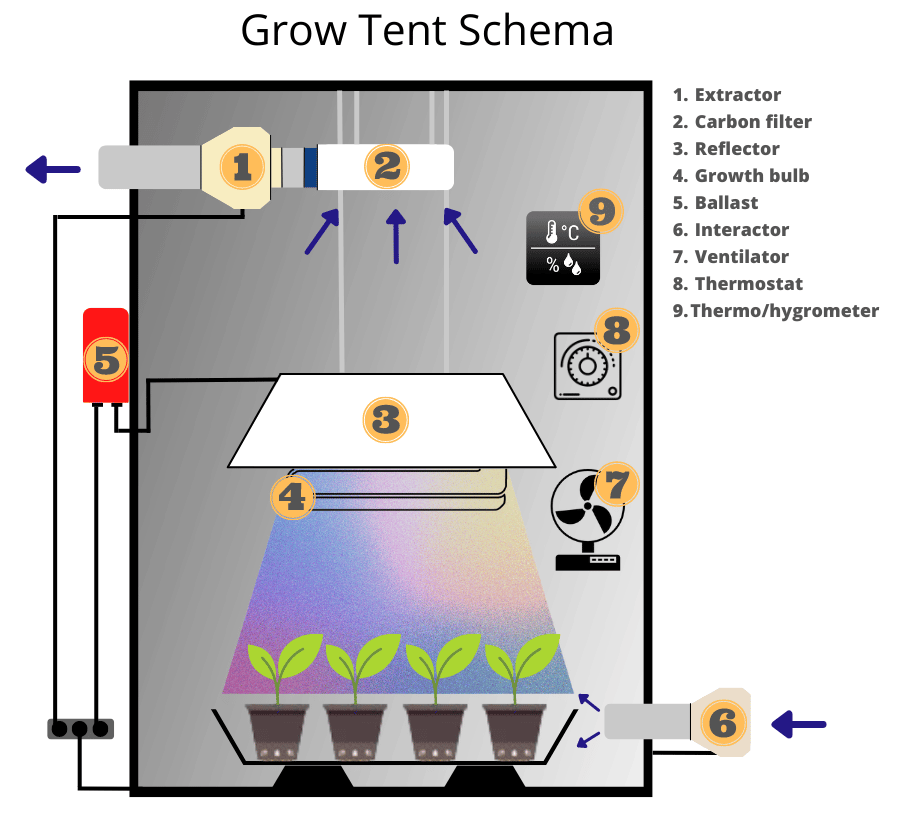
Set Up Your Hydroponic Herb Garden
Once herb types are chosen, establish the fundamentals of an efficient hydroponic garden. Source specialized nutrients and pH buffers formulated for leafy herbs. Select systems like simple ebb and flow kits that offer beginner friendliness for starting out. More advanced growers may incorporate greenhouse controllers and automated watering/feeding cycles.
Remember lighting elements that mimic full spectrum sunshine, like broad spectrum LEDs or wide hood high pressure sodium lamps. Install these above the system, allowing easy height adjustments as seedlings mature. Set up ventilation fans to stabilize temperatures and humidity ranges that herbs favor. Position systems near electrical outlets and water lines for convenience.
Herbs Planting
With a fully operational hydroponic garden ready, transplant prestarted herb seedlings into the system. Gently place root masses inside net pots, clay pebbles or perlite-filled buckets, making sure established roots make good contact with nutrients below. Top off media with additional pellets or a cover of blackout plastic to prevent light entering the root zones.
Allow transplanted seedlings a few days to recover from any shock while monitoring for signs of transplant stress. Leaves may temporarily wilt while regaining turgidity. Initial slowness gives way to major growth spurts as hydroponic roots establish rapidly within their optimized new medium!

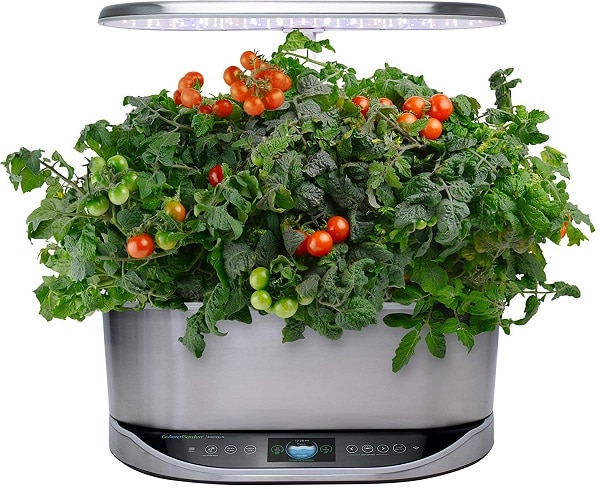
- WiFi and Alexa Compatible, Stainless Steel Grow up to 9 plants, up to 24duim
- Includes everything you need to grow
- 50 watt LED Grow Lights, perfect spectrum for fast growth & big harvests
Observing and Adjust
Watch plants daily for two weeks following transplantation for any indications of nutrient deficiencies, chemical burn, dampening off disease or problems setting in. Diagnose yellowed leaves, wilted stems, discolored spots and unhealthy root zones early and adjust environmental factors or nutrient balances accordingly before plants worsen.
Common rookie mistakes involve improper pH fluctuations that hinder nutrient absorption by the roots. Excess salts, insufficient oxygenation or insecure light exposure also cause avoidable setbacks. Keep humidity in check and ventilation consistent to prevent fungal issues. When factors align correctly, hydroponic herbs respond beautifully with vigorous, sustained momentum.
Harvesting Your Hydroponic Herbs
The controlled settings accelerate growth rates, reaching harvesting maturity up to 25% faster than soil gardening. Sample flavor at 6 weeks onwards to test aromatic develop and decide the perfect moment for harvest. Snip more mature lower leaves first before moving up the stems and early flower heads.
Unlike outdoor plants washed after cutting, hydroponic herbs come freshly cleaned and ready for immediate usage. Replace harvested portions by pruning above leaf nodes, which then bush out two new shoots. Stagger harvesting over several weeks bolsters production momentum and maximizes usable yields throughout each season before needing to restart plants from seed.
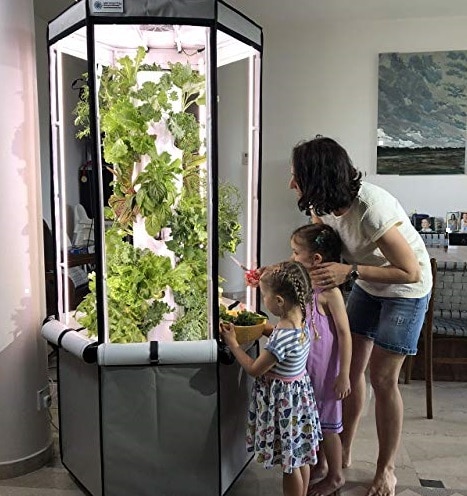
- Easy to use aeroponic system for your home
- Fan - Grow Lettuce, Herbs, Veggies & Fruits
- Grow smart & eat healthy, 20 gallon water reservoir Grow Tent, LED Grow Lights
Helpful Tips for Growing Herbs Hydroponically
Growing herbs hydroponically, meaning without soil, has become an increasingly popular method for gardeners and herb enthusiasts. Hydroponic systems allow greater control over nutrient levels, lighting, water, and other environmental factors.
For many, this leads to faster herb growth, higher yields, and more robust flavor profiles. From indoor grow setups to small-scale systems, hydroponics makes herb gardening possible even with limited space.
If you’re considering getting started with hydroponic herb gardening, this section provides helpful tips and advice:
- Test pH and nutrient levels weekly. Herbs thrive best at a pH between 5.8-6.3 with electrical conductivity readings around 1.2-1.6 ms/cm. Fluctuations outside optimal ranges hinder absorption of essential elements. Calibrate meters before use and adjust pH up or down accordingly.
- Prune herbs frequently to encourage bushy growth. Removing flower heads redirects energy toward more foliage. Cutting above leaf nodes triggers new offshoot branches. Frequent harvesting maximizes production over time.
- Invest in quality LED full spectrum grow lights. Herbs need 14–16 hours of bright light daily to nourish dense leaf and stem development. Position lights close to plants, adjusting height as they grow. Replace grow lamps every 3–5 years for maximum usable light intensity.
- Maintain nighttime temperatures 10° cooler than daytime. Herbs utilize the contrast between 65-70°F nights and 75-80°F daytime temperatures to drive transpiration and grow heartily. Boost humidity levels to 60%+ for nighttime. Install small heaters with a thermostat to auto adjust temperatures.
- Avoid overcrowding plants in systems to minimize disease transmission. Allot adequate space between seedlings for future growth width. Improve air flow by filling only every other site in hydroponic setups. Isolate mint in separate containers to control its spreading roots. Replace old nutrient solutions to prevent pathogenic bacteria.
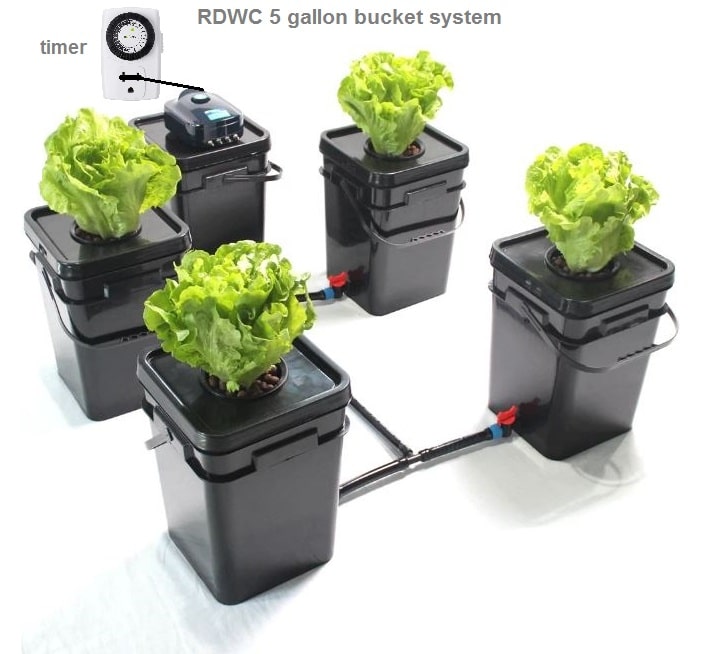
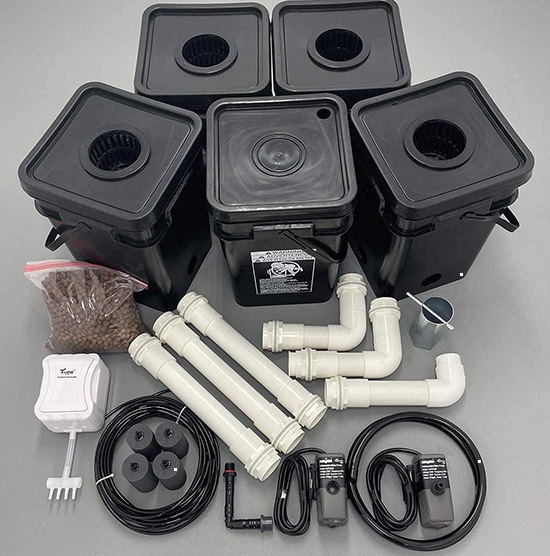
- Reservoir Bucket Connected to 4 Grow Buckets
- 400 Gallon/hour Circulating Pump
- Large 5 gallon square buckets, pre-drilled
Frequently Asked Questions
What is the typical growth timeline for herb seedlings?
Most herb seeds germinate in 5–21 days when kept moist and warm. Basil, cilantro, parsley, chives, oregano, thyme, and rosemary typically sprout in 7–14 days. Seedlings are ready for transplanting in 2–6 weeks typically.
Provide ample light and be careful not to overwater, as Herbs grown from seed reach maturity and are ready for first harvest in 8–12 weeks on average. Some varieties like cilantro mature even faster in as little as 5–6 weeks after germinating. Others can take up to 16 weeks, like rosemary and sage.
Can I grow hydroponic herbs without soil?
Yes, hydroponic systems allow growing herbs without any soil. The plant's roots are supported by an inert media like perlite, clay pellets, coconut coir or rockwool. Nutrient-rich water provides all the minerals and nutrients the plants need. This leads to faster growth than growing in soil for most herbs.
What growing media work best for hydroponic herbs?
The best hydroponic media options for growing herbs are:
- Provides excellent drainage and aeration for plant roots. It's lightweight.
- Coconut coir. Made from coconut husks, so provides some buffering capacity for roots and naturally has antifungal properties. Holds some water.
- Clay pellets. These porous pebbles allow great oxygen flow. They're reusable and heavier than other media, especially suitable for larger plants.
- Created from molten rock spun into a wool-like material. It holds a lot of moisture yet gives excellent drainage too. The high pH may need to be amended.
Where should I put a hydroponic herb garden indoors?
The best place to locate an indoor hydroponic herb garden is where it can receive plenty of light. Herbs need at least 6 hours per day of good sunlight or supplemented with full spectrum grow lights. Southern, eastern or western facing windowsills are ideal spots in most homes to provide sufficient natural light. Grow tents and open shelves also work well situated close to windows.
What are the water requirements for hydroponic herbs?
Monitoring and maintaining proper water quality and levels is imperative in hydroponics since no soil buffers are present. Herbs prefer a pH between 5.8 to 6.5 in the hydration solution. Nutrient concentrations should fall in the 1.2 to 1.6 EC range when growing varietal herbs.
Frequent topping up with fresh nutrient solution is key, replacing at least 20-30% of water volume every 1–2 weeks. Completely draining and refilling tanks every month prevents excess salt buildups.
- Coverage Full Spectrum Grow Lights
- For Indoor Hydroponic Plants Veg Bloom
- 3 years Professional Service and free return for 90 days