Are you looking for a way to grow fresh and nutritious microgreens right in the comfort of your own home? Hydroponic gardening is the perfect solution! With this technique, you can grow microgreens year-round, regardless of the weather outside.
In this article, we’ll walk you through the steps of growing microgreens hydroponically, so you can enjoy a constant supply of fresh, healthy greens that are packed with flavor and nutrients.

If you are interested in Hydroponic Nutrients, of course, you also be interested in indoor hydroponic systems to help you easily start growing plants and grow tomatoes all year round. Our top articles: Our Picks for the 5 Grow Tent Kits, Picks for the 5 Aeroponics Systems, Our Picks for the 5 Hydroponic Bucket Systems with Buyer’s Guides, and Our Picks for the 5 best indoor vertical Garden, and Led Grow Lights for an indoor plant, and The Best Hydroponic Tower for Indoor Garden.
What are Hydroponic Microgreens?
Hydroponic microgreens are young, edible plants that are grown using a hydroponic system instead of soil. These delicate and flavorful greens are typically harvested when they are just a few inches tall, making them the perfect addition to salads, sandwiches, and smoothies.

Hydroponics is a method of growing plants in a water-based, nutrient-rich solution, without the use of soil. In hydroponic systems, plants are grown in a controlled environment that allows for maximum nutrient uptake and efficient use of resources such as water and space. By using hydroponics, you can grow microgreens faster and with less water than with traditional soil-based methods.
Microgreens are packed with flavor and nutrition, containing up to 40 times more vitamins and minerals than their mature counterparts. They are also a sustainable and cost-effective way to grow your own fresh produce at home. With hydroponic microgreens, you can enjoy the benefits of homegrown greens all year round, regardless of the season or climate.
Growing Microgreens Hydroponically vs In Soil: Main Benefits
| Aspect | Hydroponic Growing | Soil Growing |
| Growth Rate | Faster | Slower |
| Yield per Area | Higher | Lower |
| Water Usage | Lower | Higher |
| Nutrient Control | Better | Less Control |
| Maintenance | Easier | More Challenging |
| Space Requirement | Smaller | Larger |
| Harvest Time | Shorter | Longer |
| Flavor and Nutrition | Higher | Lower |
| Pest and Disease Resistance | Higher | Lower |
Growing microgreens hydroponically offers several benefits over growing them in soil:
- Faster growth: Microgreens grown hydroponically typically grow faster than those grown in soil. This is because hydroponic systems provide a controlled environment that allows for optimal nutrient uptake and efficient use of resources like water and light.
- Higher yields: With hydroponics, you can achieve higher yields of microgreens in a smaller space compared to traditional soil-based methods. This makes hydroponics an ideal choice for those with limited gardening space.
- More consistent results: Hydroponic systems provide a consistent environment that helps ensure more uniform and predictable results compared to growing in soil, where variables such as soil quality and moisture levels can be difficult to control.
- Reduced water usage: Hydroponic systems use less water than traditional soil-based methods because water is recirculated in a closed system, reducing waste.
- Less susceptibility to pests and diseases: Hydroponic systems are less susceptible to soil-borne pests and diseases that can affect traditional soil-based growing methods. This makes hydroponic growing a more sustainable and low-maintenance option.
- They can grow anywhere: Hydroponic microgreens can be grown in any indoor location with adequate lighting, regardless of the climate or weather conditions outside. This makes it an ideal choice for urban gardeners and those living in apartments or areas with limited outdoor space.
- More control: Hydroponic systems allow for more precise control over the growing conditions, such as nutrient levels, pH, and temperature. This allows growers to optimize the growing conditions for maximum yield and quality.
- No composting: Unlike traditional soil-based methods, hydroponic systems do not produce any compost that needs to be disposed of, making it a more convenient and low-maintenance option.
- Some microgreens grow better hydroponically: Certain microgreens, such as wheatgrass and sunflower greens, grow better in hydroponic systems than in soil-based systems. This is because they require high moisture levels and can benefit from the constant supply of nutrient-rich water in hydroponic systems.
- Easy to use aeroponic system for your home
- Fan - Grow Lettuce, Herbs, Veggies & Fruits
- Grow smart & eat healthy, 20 gallon water reservoir Grow Tent, LED Grow Lights
What is the Best Hydroponic System for Growing Microgreens?
There are several hydroponic systems that are suitable for growing microgreens, but the best one depends on your needs and preferences. Here are some popular hydroponic systems for growing microgreens:
Nutrient Film Technique (NFT)
This hydroponic system involves a shallow channel or tray with a thin film of nutrient-rich water flowing over a sloped surface where the plants are grown. The plant roots are suspended in the water film and absorb nutrients directly.

NFT systems are ideal for growing delicate microgreens that do not have deep roots, such as arugula, basil, and cilantro. NFT systems require a pump to circulate the water and a reservoir to hold the nutrient solution. They are easy to set up and maintain, and they use less water than other hydroponic systems.
Deep Water Culture (DWC)
DWC is a simple hydroponic system that involves suspending the plants’ roots in a nutrient-rich water solution. The plants are grown in net pots, which are placed in a container filled with water and nutrient solution. An air stone or pump is used to oxygenate the water and prevent stagnation.
DWC systems are ideal for growing a large number of microgreens in a small space, such as pea shoots, wheatgrass, and sunflower greens. They are easy to set up and maintain, and they are affordable.
Drip Irrigation
Drip irrigation systems deliver a controlled amount of nutrient-rich water directly to the roots of the plants using drip emitters or micro-sprinklers. The plants are grown in a growing medium, such as coconut coir, peat moss, or vermiculite.
Drip irrigation systems are easy to set up and can be used to grow a wide variety of microgreens, such as amaranth, chard, and kale. They require a pump to deliver the water and a timer to control the frequency and duration of the watering cycles.
Aeroponics
These systems use misters or atomizers to deliver nutrient-rich water directly to the roots of the plants. The plants are grown in net pots or foam inserts that hold the roots in place. The roots are suspended in the air, and the misters or atomizers deliver water and nutrients at regular intervals.
Aeroponic systems are ideal for growing delicate microgreens like basil and cilantro, as well as more substantial greens like watercress and spinach. They require a pump, a reservoir, and a timer to control the watering cycles.
When choosing a hydroponic system for growing microgreens, consider the types of microgreens you want to grow, the available space and budget, and the level of experience you have with hydroponic gardening. Each system has its advantages and disadvantages, and some may be more suitable for your needs than others.
More Hydroponics Systems read in our Articles: 1 2 3
How to Choose Medium for Growing Microgreens Hydroponically?
Choosing the right medium for growing microgreens hydroponically is essential for the success of your crop. The medium should be able to support the plants’ roots, provide adequate drainage, and hold moisture and nutrients.
Here are some factors to consider when choosing a medium for growing microgreens hydroponically:
- Water retention: It should be able to hold water and nutrients while allowing excess water to drain away. The ideal medium should retain moisture but not become waterlogged, as this can lead to root rot.
- Nutrient availability: The medium should be able to provide nutrients to the plants. Some mediums, like coconut coir and rockwool, are pH-neutral and do not contain any nutrients. In this case, you will need to add nutrients to the hydroponic system’s water supply.
- Sterility: It should be sterile and free of pathogens to prevent diseases and pests from affecting your crop. Some mediums, like soil and compost, can contain harmful bacteria and fungi that can harm the plants.
- Ease of use: It should be easy to handle and use. Some mediums, like perlite and vermiculite, can be messy and dusty, while others, like coconut coir and rockwool, are easy to handle and store.
- Cost: The cost of the medium is another factor to consider. Some mediums, like soil and compost, are inexpensive, while others, like rockwool and coco coir, can be more expensive.
Some popular mediums for growing microgreens hydroponically include:
Rockwool
It is a popular hydroponic medium that is made from spun volcanic rock. It is pH-neutral and provides excellent water retention and aeration. Rockwool is sterile and easy to handle, but it can be expensive.
Coco coir
It is a renewable and sustainable medium made from coconut husks. It is pH-neutral and provides excellent water retention and aeration. Coco coir is easy to handle and store, but it can be expensive.
Perlite
Perlite is a lightweight volcanic rock that provides excellent drainage and aeration. It is inexpensive and easy to handle but can be dusty and messy.
Vermiculite
It is a lightweight mineral that provides good water retention and aeration. It is pH-neutral and easy to handle but can be expensive.
Oasis foam
Oasis foam is a water-absorbing foam that provides excellent water retention. It is easy to handle and use, but it can be expensive and is not reusable.
When choosing a medium for growing microgreens hydroponically, consider the factors above and experiment with different mediums to find the one that works best for your crop and growing conditions.
Best Temperature and Lighting Conditions for Hydroponic Microgreens
Temperature and lighting are two critical factors for growing microgreens hydroponically. Here are some guidelines for creating optimal temperature and lighting conditions for your microgreens:
Temperature:
- The ideal temperature range for most microgreens is between 60°F and 75°F (15.5°C to 24°C).
- Microgreens can tolerate a wider range of temperatures, but they will grow slower or faster depending on the temperature.
- Avoid temperatures below 50°F (10°C) or above 85°F (29°C), as extreme temperatures can stunt growth or cause the plants to wilt.
- Monitor the temperature regularly using a thermometer and adjust the temperature by using a heater or air conditioning unit if necessary.
Lighting:
- Microgreens require a minimum of 12 to 16 hours of light per day.
- Artificial lighting is the best option for growing microgreens, as it provides consistent light and allows you to control the intensity and duration of the light.
- The ideal light spectrum for microgreens is a mix of blue and red wavelengths, which are best for promoting growth.
- LED grow lights are the most efficient and effective type of lighting for microgreens.
- The intensity of the light should be between 200 and 400 μmol/m2/s for most microgreens.
- Keep the light source as close to the plants as possible without touching them, as this will ensure maximum light penetration.
- Monitor the plants regularly for signs of stress or light burn, which can occur if the light is too intense or too close to the plants.
Best Nutrients for Growing Microgreens Without Soil
Growing microgreens hydroponically requires the addition of nutrients to the water to ensure the plants receive the essential elements they need to grow and develop properly.
Here are some of the best nutrients to use for growing microgreens without soil:
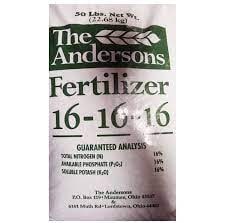
- General Hydroponics Flora Series: This is a popular nutrient solution for hydroponic growers and provides a complete range of essential nutrients for plants, including nitrogen, phosphorus, potassium, calcium, and magnesium.
- Fox Farm Liquid Nutrient Trio: This nutrient solution is specially formulated for hydroponic systems and provides a complete range of nutrients, including macro and micronutrients, vitamins, and minerals.
- MaxiGro and MaxiBloom: These dry nutrient powders are designed for use in hydroponic systems and provide essential elements for plant growth and development, including nitrogen, phosphorus, and potassium.
- Botanicare Pure Blend Pro Grow and Bloom: This nutrient solution is designed for use in hydroponic systems and provides a complete range of nutrients, including macronutrients, trace minerals, and organic supplements.
- Dyna-Gro Liquid Grow and Liquid Bloom: These nutrient solutions are formulated for use in hydroponic systems and provide a complete range of essential nutrients, including nitrogen, phosphorus, and potassium, as well as micronutrients, trace elements, and organic supplements.
When selecting a nutrient solution for growing microgreens hydroponically, it is important to choose a solution that is specifically formulated for hydroponic systems. These solutions contain the essential elements that plants need to grow and develop properly, and they are often more balanced and effective than traditional fertilizers.

What Microgreens Grow Best Hydroponically?
Many types of microgreens can be grown hydroponically, but some varieties may be better suited for this method of growing than others:
- Wheatgrass: This is a popular microgreen that is easy to grow hydroponically. It grows quickly and is packed with nutrients, including vitamins, minerals, and antioxidants.
- Sunflowers: They are quick to germinate, and their crunchy texture and nutty flavor make them a delicious addition to salads and sandwiches.
- Pea shoots: They have a slightly sweet, delicate flavor and are high in vitamins and minerals.
- Radish: Radish microgreens are fast-growing and have a slightly spicy flavor. They are high in vitamins and minerals and can be harvested in just a few weeks.
- Broccoli: Is a great source of vitamins A, C, and K, as well as calcium, iron, and antioxidants. It has a slightly bitter flavor and are often used in salads and sandwiches.
- Basil: It has a sweet, fragrant flavor and are often used in Italian and Thai cuisine.
It’s worth noting that different varieties of microgreens may have different requirements when it comes to nutrient levels, temperature, and lighting. It’s important to research the specific needs of the microgreens you plan to grow and adjust your hydroponic system accordingly to ensure optimal growth and flavor.
Materials for Growing Microgreens Without Soil
Growing microgreens without soil requires some basic materials to ensure healthy growth and a bountiful harvest.
Microgreen Seeds
The first thing you will need is a good supply of microgreen seeds. There are many different types of microgreen seeds available, including sunflower, pea shoots, radish, broccoli, and many more.
When choosing seeds, it’s important to look for high-quality, organic seeds that are free from any contaminants or pesticides. You can purchase microgreen seeds from your local garden center or online.
Lights
Next, you will need a good source of light for your microgreens. Since they will not be getting any natural sunlight, you will need to provide artificial light to ensure healthy growth.
LED grow lights are a popular choice for growing microgreens since they are energy-efficient and can provide the right spectrum of light for optimal growth.
Growing Medium
When growing microgreens hydroponically, you will need a growing medium to provide support for the roots and to hold moisture.
There are many different types of growing mediums you can use, including coconut coir, perlite, vermiculite, or peat moss. Some growers also use special hydroponic mats or pads designed specifically for growing microgreens.
pH Test Kit
It’s important to monitor the pH level of your nutrient solution to ensure that your microgreens are getting the right balance of nutrients.
A pH test kit is an essential tool for any hydroponic grower, as it allows you to test the acidity or alkalinity of your nutrient solution and make adjustments as needed.
Spray Bottle
A spray bottle can be used to mist your microgreens and keep them moist. This is especially important during the germination stage, when the seeds need to be kept moist but not waterlogged.
A fine mist spray bottle is ideal for this purpose, as it can deliver a gentle mist without disturbing the seeds.
Nutrients
Finally, you will need to provide your microgreens with a source of nutrients to support healthy growth. There are many different types of hydroponic nutrients available, including liquid and powder formulations.
Look for a nutrient solution that is specifically designed for growing microgreens, and be sure to follow the instructions carefully to avoid overfeeding or underfeeding your plants.
Step-by-Step Guide for Growing Microgreens at Home
Growing microgreens at home is a great way to add fresh and nutritious greens to your diet. However, getting started can seem daunting if you’re not sure where to begin.
Below, we will provide you with a step-by-step guide for growing microgreens at home without soil.
Step 1: Set the Water
The first step in growing microgreens hydroponically is to set up your water system. Fill a container with clean water and add the appropriate amount of hydroponic nutrients according to the package instructions. Nutrient-rich water is essential to ensure that your microgreens grow healthy and strong.
Step 2: Prepare Your Grow Space
Choose a suitable location for your microgreen grow space. It should be a well-lit area with consistent temperatures. If you don’t have access to natural light, you will need to set up grow lights.
Lay down your chosen growing medium, such as coconut coir or vermiculite, which will provide a stable base for your microgreens to grow.
Step 3: Spread Your Seeds
Evenly spread your microgreen seeds across the growing medium. Be sure to follow the package instructions for the appropriate density of seeds per square inch.
This is important to ensure that your microgreens have enough space to grow and don’t overcrowd each other.

Step 4: Spray Mist and Light-Proof Your Setup
After spreading your seeds, lightly mist them with a spray bottle of water. This will help to keep the growing medium moist and promote germination.
Cover your setup with a light-proof lid or cloth to prevent light from reaching the seeds before they germinate. This will help to ensure a high germination rate.
Step 5: Check and Water as Required
Check your microgreens daily and water as required to keep the growing medium moist. Use a spray bottle to lightly mist the microgreens, being careful not to overwater.
Overwatering can lead to mold growth and other issues, so it’s important to monitor the moisture levels of your growing medium.
Step 6: Monitor Daily
Monitor your microgreens daily for signs of growth and check the pH level of your nutrient solution regularly. Adjust the nutrient solution as needed to ensure optimal growth.
You can use a pH test kit to measure the pH level of your nutrient solution. The ideal pH range for growing microgreens is between 5.5 and 6.5.
Step 7: Harvesting
After approximately 7-14 days, your microgreens should be ready for harvesting. They should have developed their first set of true leaves, and the stems should be about 1-2 inches long.
Use a sharp pair of scissors to cut the microgreens just above the growing medium. Rinse them in cool water and pat them dry. Your fresh and nutrient-packed harvest is now ready to enjoy!
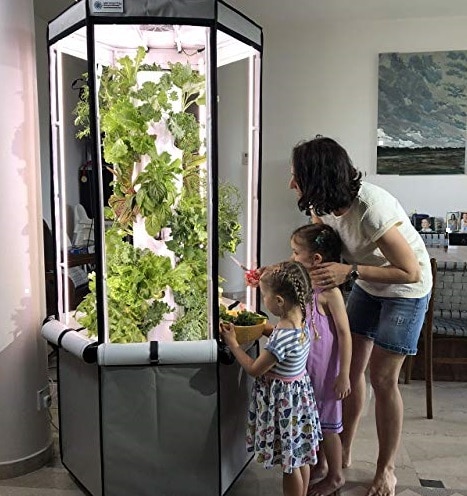
BONUS: Features of Growing Microgreens on a Commercial Scale
Growing microgreens on a commercial scale requires different considerations compared to growing them at home. The primary focus is on efficiency and consistency in the growth process, while maintaining high quality and output.
Here are some of the main features:
1. Space
If you’ve been growing your greens on a windowsill and are looking to expand, then you’d have to find alternative options that would cater to your needs.
While starting out, you may want to use any available space you have, such as a spare room or basement. However, this wouldn’t suffice when it comes to commercial-scale production.
This space needs to be large enough to accommodate the necessary equipment and racks for growing, as well as for storage and processing.
2. Racks
To make the most out of the limited space in your home and turn your passion for microgreens into a profitable business venture, you can invest in growing racks or build something yourself using readily-available materials.
These specially-designed racks help maximize vertical space by providing multiple layers for plants while utilizing only a small footprint.
The racks should also have trays that can be easily moved in and out of the growing area for planting, harvesting, and maintenance.
By doing so, you could grow lots of microgreens year-round without sacrificing too much floor area and will save yourself from being cramped up in the process.
3. Automated Hydroponic System
If you’re tired of manual watering of your plants and microgreens, an automated hydroponic system may be the solution for you. With pre-programmed cycles, this system can supply water and nutrients to your plants using the Nutrient Film Technique (NFT).
In this process, an aerated nutrient solution passes through trays during specific times. The result is a highly efficient way to grow your plants, as the entire process happens automatically without the need for human interference.
Another hydroponic method worth considering is the Deep Water Culture system. This technique involves putting seeds in media and suspending them in nets or perforated trays in water. It’s an excellent option if you want an easy-to-set-up system that requires minimal maintenance.
However, this technique is not very common in large-scale operations since it can become challenging to manage many plant roots in one container.
Overall, whether you choose NFT or DWC systems depends on your preference, budget and skill level as both are great options for growing healthy greenery!
4. Fans
Fans play a critical role in maintaining the health of indoor plants and microgreens. Without a sufficient amount of air circulation, stagnant air can increase the chances of fungus or mold growing on your plants. This is especially concerning in large, moist areas where there is little to no airflow.
In addition to providing essential oxygen for healthy plant growth, adequate ventilation also helps prevent moisture from collecting on leaves where it can lead to disease or other issues.
Ensuring proper ventilation becomes even more important when cultivating microgreens. These tiny shoots are incredibly delicate and require consistent care to thrive. Properly circulating the air around them can help prevent bacteria growth that could spoil your crops before they are ready to harvest.
Additionally, fans help regulate heat levels that could dry out or burn your plants. Whether you’re an amateur gardener or seasoned professional, using fans is essential for creating optimal conditions for growing healthy plants and robust microgreens alike.
5. A Reservoir, Pump, and Timer
Hydroponic microgreen farmers know that time is a precious resource, and every minute counts when it comes to growing crops.
This is why investing in a reservoir, pump, and timer is a wise choice for those who want to grow their microgreens on a large scale.
These three components work together in harmony to help automate the watering process – saving hundreds of hours per year while ensuring consistency in the end product.
A reservoir can be any container that’s big enough to hold several gallons of water. The larger your farming operation, the bigger your reservoir should be.
Then, a pump delivers water from your reservoir to your plants through tubing attached to each plant’s root zone. Using a timer allows you to set specific times for watering so that plants receive the same amount of water at specific intervals throughout the day.
With these three elements, hydroponic microgreen farmers can sit back and watch as their crops receive consistent amounts of water without any additional effort. In short, automating irrigation saves time and helps ensure growers get a great harvest every time!
6. Pest and Disease Control
One of the significant challenges in growing microgreens is ensuring that pests and diseases don’t ruin your harvest. When you have a larger setup, the risk of pest and disease infestation is even higher.
The reason for this is that a bigger area with closely arranged microgreen trays makes it easier for pathogens to spread quickly. Since microgreens take only a few weeks to grow, an entire crop can be lost in a matter of days or even hours if pests infiltrate the farm.
Fortunately, it’s possible to control pest and disease problems when growing microgreens. One useful technique is hydroponic farming, where the crops are grown in water instead of soil.
This helps because most hydroponic farmers fail to relate to the disease problems experienced by other farmers. In addition, depending on the type of pest, it’s easy to formulate organic practices that can keep them at bay.
Regularly inspecting crops, removing weeds promptly, maintaining good air circulation within the grow tent or greenhouse are also essential actions that can help prevent pest infestations and identify any problems before they become uncontrollable.
7. Harvesting Tools
Harvesting microgreens can be a time-consuming process when done manually. That’s why investing in an electric harvesting tool like the Quick Cut Greens Harvester can significantly cut down on labor costs and save time.
This tool is specifically designed for baby greens, but it’s also gentle enough to harvest microgreens without damaging them.
For large-scale microgreen operations that require hundreds of trays of harvest each week, using a traditional knife or scissors would create an unnecessary amount of work hours.
The Quick Cut Greens Harvester makes the process more efficient by allowing users to quickly trim the greens with precision and speed.
Not only does this save valuable time, but it also results in crops that are harvested at their peak freshness, making them more appealing to customers.
Overall, an electric harvesting tool like the Quick Cut Greens Harvester is a worthwhile investment for any serious microgreen grower looking to streamline their operations and increase efficiency.
By freeing up time from manual labor tasks like harvesting, growers can focus on other important aspects of their business like marketing and expanding production capabilities.
Hydroponic Microgreens Maintain & Grow Tips
Like any plant, they require proper maintenance to ensure optimal growth and health. Here are some tips to maintain and grow hydroponic microgreens:
- Maintain proper pH levels. The pH level of the nutrient solution is critical to the growth and health of microgreens. The ideal pH range for hydroponic microgreens is between 5.5 and 6.5. Using a pH test kit, regularly monitor the pH levels and adjust as needed with a pH up or pH down solution.
- Monitor nutrient levels. Microgreens require a specific balance of nutrients to grow optimally. Use a quality nutrient solution and monitor the levels of each nutrient regularly. Adjust the nutrient solution as necessary to ensure a balanced and healthy growing environment.
- Maintain proper lighting. It is crucial for the growth and development of hydroponic microgreens. Grow lights should be positioned to provide the necessary amount of light for the specific type of microgreen being grown. As a general rule, most microgreens require 12-16 hours of light per day. Adjust the light height and intensity as the microgreens grow.
- Ensure proper air circulation. Good air circulation is essential for preventing disease and promoting healthy growth. Use fans to circulate air and reduce excess humidity. Open windows or vents to provide fresh air to the growing area.
- Harvest at the right time. Microgreens are typically ready to harvest when the first set of true leaves appear. Use clean scissors or a sharp knife to harvest the microgreens at the base of the stem.
BONUS: Mistakes to Avoid When Growing Microgreens at Home
Many growers make common mistakes when starting out with hydroponic microgreen growing. These mistakes can lead to poor yields, wasted time, and financial loss.
By avoiding these mistakes and implementing best practices in hydroponic cultivation techniques, growers can achieve a consistent harvest of high-quality microgreens efficiently.
1. Watering from the Top
While spraying water from the top may seem like an easy solution, it can actually cause more harm than good. By saturating the leaves and stems, water droplets can become trapped, leading to the development of mold. This not only affects the aesthetic appeal of your microgreens but can also pose a health risk if consumed.
To avoid this issue, it is recommended to switch to bottom watering once your microgreens have sprouted. By placing your tray in a shallow dish of water and allowing the soil to soak up moisture through the drainage holes, you’re providing ideal growing conditions without dampening the plant’s foliage.
Bottom watering also encourages deeper root growth as plants seek out water, ultimately leading to stronger and healthier crops.
2. Too Humid Environment
Humidity is a crucial factor in the growth and development of microgreens. However, maintaining an optimal level of humidity can be challenging as too much or too little can impede their growth.
While low humidity levels can cause the plants to dry up and wilt, excessive moisture can result in mold and fungal growth, damaging the crops’ quality.
To keep your microgreens healthy and thriving, it is recommended to maintain a relative humidity level between 30-50%. If the air’s moisture content exceeds this range, using a dehumidifier can help regulate it effectively.
Additionally, increasing the temperature in the room also increases its humidity level. Therefore, it is advisable to use air conditioning systems that regulate both temperature and humidity levels simultaneously for better results.
3. Use of Non-natural Growing Medium
Many growers resort to using unnatural growing mediums due to their lower cost compared to natural ones or limited availability of the latter in their area.
While these options may seem like a convenient and practical solution, they can pose several risks to both your health and the environment.
Using unnatural growing mediums such as synthetic fertilizers, chemical pesticides, or non-organic soil can expose the plants to harmful substances that may end up in the final product.
If you plan on selling or distributing your microgreens commercially, it’s crucial to ensure that they’re safe for consumption by using 100% natural growing mediums.
Additionally, organic microgreens are becoming increasingly popular among consumers who prioritize sustainability and health-conscious choices, providing an extra incentive for using natural mediums in your cultivation practice.
4. Overseeding
Overseeding is a common practice that involves planting additional seeds on an existing lawn or landscape. This technique is used to enhance grass density, improve the overall appearance of lawns, and promote healthy growth.
However, one major issue associated with overseeding is mold growth. When too many seeds are spread in a given area, the microgreens become too close together to facilitate proper aeration and penetration of light. The result is an environment that promotes mold growth.
Over-seeding might appear like an easy fix for thinning grass but only ends up creating more significant issues in the long term hence not worth practicing at all costs.
5. Overwatering
Microgreens are no exception- if they are overwatered, their roots may start to rot, depriving them of much needed nutrients and eventually leading to their death. Therefore, it is highly important to maintain an optimal balance between water and air in the hydroponic system.
If using mats in trays for growing microgreens, it is essential that you do not let the water level rise beyond your knuckle when you tilt the tray. This way, excess moisture can be prevented from seeping into the soil, thus safeguarding their roots from rotting.
While this may mean that growers have to add water routinely, it serves as a significant precautionary measure against any unforeseen risks associated with overwatering.
On the other hand, if you’re not prepared for frequent watering schedules or simply want to avoid manual intervention entirely, incorporating automated systems like NFT can greatly help regulate water levels and reduce chances of overwatering significantly.
6. Exposure of Sprouts to Light Too Early
It’s important to keep the seeds in the dark for the first few days after planting as this ensures their survival. The process of growing sprouts involves several stages, and they need a specific environment during each one.
Seedlings that get light right away may look weak and thin compared to those kept in darkness. By not allowing the seedlings to struggle for light, they become weaker and are at a higher risk of damage or disease.
One to three days in complete darkness is best for most seed types. This helps with germination while encouraging stronger growth later on.
After this period, it’s safe to expose your sprouts gradually to light, perhaps starting with just a couple of hours per day before gradually increasing the duration as needed.
7. Skip Sanitizing Your Equipment
Skipping the sanitization of your equipment can lead to disastrous consequences for your microgreens, as it increases the likelihood of microbial and chemical contamination.
It’s critical to wash and sterilize every piece of equipment you’ll be using to prevent cross-contamination. Even if you’re using brand-new trays, there could still be traces of unwanted substances that have settled onto them during transportation or storage.
After washing your trays with soapy water, make sure to sterilize them thoroughly either by boiling them or by soaking them in a mild bleach solution.
You should also clean the area where you’ll be setting up your microgreen garden regularly to minimize pests and disease infestation. Neglecting these steps can lead to stunted growth, reduced yields, and even complete loss of your crop.
8. Using Fans to Reduce Mold
When growing microgreens, mold can be a common issue that many people face. One solution that comes to mind is using fans to aerate the space and combat the growth of mold.
However, this can cause more harm than good. Mold spores are easily transferable through the air, and if they are spread faster by forced air circulation, they will quickly spread to other trays, which will only exacerbate the problem.
Instead of relying on fans alone to address mold growth, it is important to take preventative measures such as avoiding overcrowding and spraying liquids on foliage.
There are a variety of practices you can put in place when cultivating microgreens that can help reduce mold growth. Adequate watering is critical as watering from the bottom rather than spraying foliage can help prevent any moisture from remaining on leaves where mold can thrive.
Lowering humidity levels with a dehumidifier also helps minimize the likelihood of mold formation but be sure to remove excess humidity without creating an overly dry environment for plants.
Ultimately, proper prevention methods such as sharing good airflow between plants and limiting conditions that may nurture mold will go far in having healthy microgreens without worrying about recurring mold issues.
9. Ignoring pH Level
If you are aiming to grow healthy and nutritious microgreens, it is essential to observe the pH levels since it plays a critical role in facilitating nutrient uptake by the plants.
If your microgreens require particular minerals such as magnesium, but your nutrient solution has an extremely low pH level, adding extra fertilizer won’t make any difference since the plant roots can’t absorb the nutrients efficiently.
As a result, ignoring pH levels could ultimately lead to deficiencies in vitamins and essential minerals that perhaps you intended to provide with the growth of microgreens.
10. Starting with Expensive Crops
Starting a hobby or business in gardening can be exciting, but sometimes the temptation to jump into cultivating more expensive crops can lead to disappointment and setbacks.
It’s important for beginners to remember that even experienced farmers had to start somewhere and take things one step at a time. Therefore, when starting out, it’s better not to focus on expensive crops as these come with high risks of failure.
Instead, it is advisable to begin by planting easy-to-grow crops whose seeds are inexpensive. This will help build your confidence and teach you the basics of soil preparation, watering, pest control, and harvesting.
By starting small and gradually moving towards more challenging plants, you’ll develop experience along the way and increase your chances of success. Plus, you’ll save money by avoiding costly mistakes that could prevent an expensive crop from growing properly.
FAQ
Do microgreens regrow after cutting?
Microgreens do not typically regrow after being cut. They are typically harvested once and then discarded or composted.
How many hours of light do microgreens need?
Most microgreens require 12-16 hours of light per day to grow optimally. However, the exact amount of light required may vary depending on the specific type of microgreen being grown.
Can microgreens grow to full size when grown hydroponically?
Microgreens are not intended to grow to full size when grown hydroponically. They are typically harvested when they are still small and tender, after the first set of true leaves appears. Hydroponic growing methods allow for rapid growth and nutrient-rich microgreens in a small space.
How often should I water my hydroponic microgreens?
The frequency of watering will depend on the specific hydroponic system being used, the growing medium, and the environmental conditions. However, as a general rule, hydroponic microgreens should be watered regularly to keep the growing medium moist but not waterlogged.
Can I reuse the growing medium for hydroponic microgreens?
The growing medium can be reused for subsequent crops of microgreens, but it is important to ensure that it is properly cleaned and sanitized between uses to prevent the buildup of harmful pathogens.
Do hydroponic microgreens require fertilizers?
Yes, hydroponic microgreens require a balanced nutrient solution to support their growth and development. Commercial nutrient mixes are available specifically designed for hydroponic microgreen production.
Can I grow hydroponic microgreens without artificial lights?
While artificial lights are typically used to provide consistent light and promote healthy growth, it is possible to grow hydroponic microgreens without them. Natural sunlight can be used, but it may require more careful positioning of the growing system and may result in slower growth rates.