Hydroponic gardening has been gaining popularity among home gardeners and small-scale farmers in recent years. One particularly effective type of hydroponic system is the Dutch bucket system. In this simple yet highly customizable setup, plants grow in inert media inside buckets, with the nutrient solution delivered directly to the roots.
The Dutch bucket system offers a number of advantages over other hydroponic and soil-based growing methods. The enclosed buckets protect plant roots while allowing control over factors like aeration and nutrient levels. This leads to faster growth rates and higher, more consistent yields. Dutch bucket systems also conserve water and fertilizer compared to soil gardening. In this article, we will cover everything you need to know about planning and installing your own Dutch bucket hydroponic system.
What is a Dutch Bucket System?
A Dutch bucket hydroponic system is a type of container gardening that uses inert growing media and nutrient reservoirs to grow plants in buckets or pots without soil. This method earned its name from the Dutch, who refined and popularized the technique.
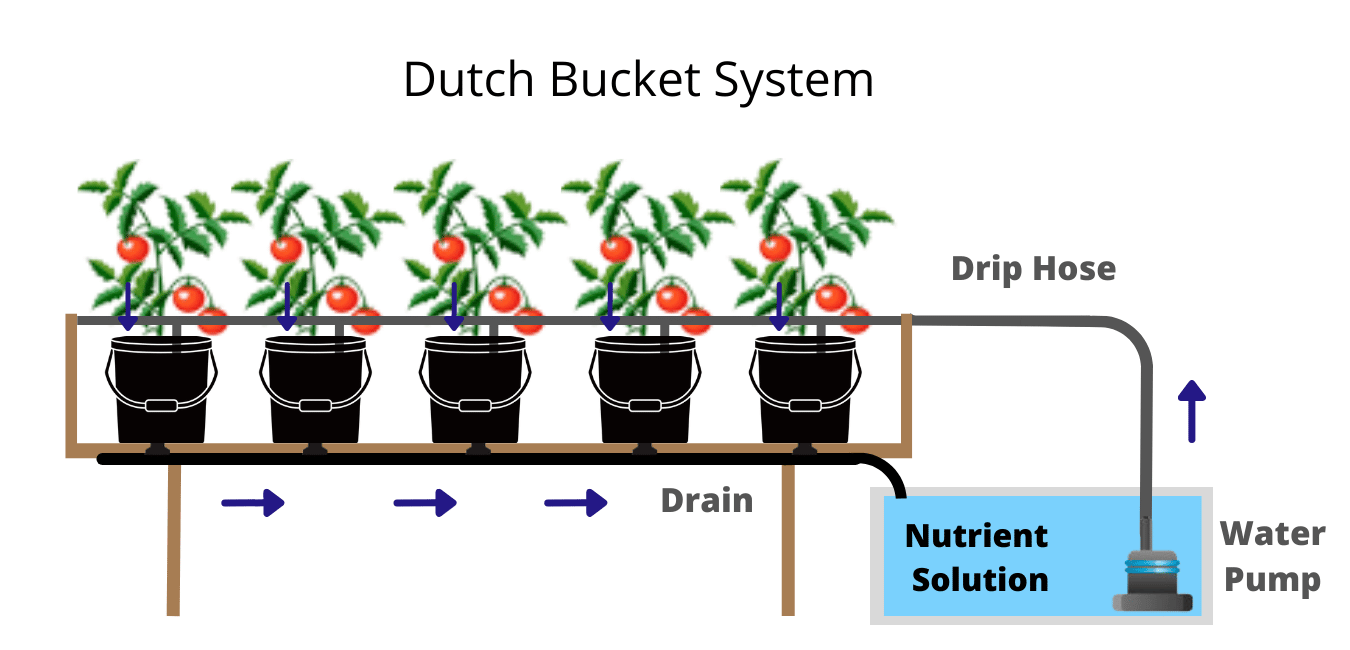
Img: Dutch Bucket Hydroponics System Schema
In a Dutch bucket setup, plants are housed in plastic buckets, usually between 5 and 10 gallons in capacity. A basket or pot with holes holds the growing media while allowing room underneath for the roots to access oxygen and nutrient solution. Clay pebbles, perlite, vermiculite, coconut coir, and rockwool are common options used for the inert media.
The buckets feature a fill tube and drainpipe. The fill tube is situated above the growing media basket and is connected via tubing to a nutrient reservoir, usually housing 20–35 liters of aqueous solution. A submersible pump pushes the solution to the fill tube, where it trickles down through the media to feed plant roots. Excess drips out through the drainpipe back into the reservoir.
Plants draw water and nutrients as needed, while their roots remain protected and aerated. Growers can control nutrient levels and other conditions in the reservoirs. Multiple buckets can be linked to one reservoir or use individual reservoirs for each bucket.
The stackable vertical design allows efficient use of indoor or greenhouse space. It’s suitable for leafy greens, herbs, tomatoes, peppers, cucumbers, and other vegetables and fruits. With optimized nutrients and lighting, Dutch bucket systems can achieve rapid, bountiful harvests.
How Does a Dutch Bucket Method Work?
The Dutch bucket hydroponic system works by delivering nutrient-rich solution directly to the roots of plants grown in an inert medium. This method maximizes growth while eliminating soil and many of its limitations.
Inside each Dutch bucket is a basket or pot filled with growing media such as clay pebbles. The media provides support for plant roots while having large pores that allow oxygenation. Below this basket are the bucket drain holes leading down to the reservoir.

Img: Dutch Bucket Hydroponics System Schema 2
A submersible pump moves the nutrient solution from the reservoir up through a fill tube situated above each bucket. The solution then flows down through the inert media, surrounding the plant roots. Gravity draws excess solution back down through drain holes into the reservoir. As plant roots take up water and nutrients, the level of solution in the reservoir decreases. Float valves help maintain adequate water levels by triggering the pump to turn on when more solution is needed.
Careful monitoring of pH and EC (electrical conductivity) levels allows growers to provide an optimized hydroponic nutrient solution for their specific crops. Deficiencies can be quickly corrected by adjusting reservoir nutrients. And by keeping an aerated, protective layer of media around roots, plants grow faster and more vigorously than in traditional soil methods.
Light levels, temperature, humidity, and other environmental factors can also be modulated to maximize production. The vertical orientation of Dutch bucket systems increases yields per square foot. By precisely controlling the root zone environment, Dutch bucket hydroponic gardens can produce higher yields with faster growth cycles compared to conventional gardening. This makes it a popular technique from small backyard greenhouses to commercial operations.
Aerospring 27-Plant Vertical Hydroponics Indoor Growing System
- Easy to use aeroponic system for your home
- Fan - Grow Lettuce, Herbs, Veggies & Fruits
- Grow smart & eat healthy, 20 gallon water reservoir Grow Tent, LED Grow Lights
Advantages of Growing with Dutch Bucket System
The Dutch bucket hydroponic system offers several major advantages over other gardening methods:
- Increased growth rates. The highly controlled root zone environment allows plants to grow up to 50% faster compared to soil gardening. Optimized nutrient levels delivered directly to roots accelerate plant development. And inert media offers better oxygenation for robust growth. The Dutch bucket system makes it possible to achieve more harvests per year.
- Higher yields. Growth rates translate into higher total yields over a full harvest cycle. And dialed-in nutrient solution levels reduce plant stress while supporting the full genetic potential. This consistency makes yield predictions more accurate. Indoor Dutch bucket gardens can produce up to 20 times the yields of outdoor soil planting.
- Water and space efficiency. Dutch bucket systems use a fraction of the water needed for traditional gardening. Recirculating nutrient solution without leakage or evaporation conserves water. The vertical stackable design also allows growing more plants per square foot for efficiently using indoor or greenhouse space.
- Reduced disease and pests. By isolating plants from soil pathogens, Dutch bucket systems avoid common root diseases. And indoor systems prevent most pests, though checks should still be made for aphids and mites. Healthy roots and growth make plants less vulnerable to the pests they do encounter.
- More control and customization. From nutrients to lighting and environmental conditions, Dutch bucket gardens allow meticulous control over the root zone and whole plant environment. Growers can easily customize and experiment to optimize outputs. These systems can scale up incrementally, making them ideal for small starts ups.
- Lower operating costs. Once initially set up, Dutch bucket systems can save money over traditional soil gardening in terms of water, fertilizer, pesticides, and labor costs. Recirculating water and nutrients reduces expenses substantially. And minimizing pest threats decreases or eliminates pesticide costs while supporting organic approaches. Higher yields and faster harvest cycles also maximize profits.
- Less physically demanding. Bending, digging, weeding and heavy lifting takes a toll with soil gardening. Dutch bucket systems place plants at an ergonomic height, minimizing strain. Inert media takes the pain out of weeding and digging. Reservoir tanks can also be positioned to avoid heavy lifting. For aging or disabled gardeners, these conveniences expand accessibility.
Disadvantages of Using Dutch Bucket Hydroponics
While Dutch bucket hydroponic systems have many benefits, there are some potential downsides to consider as well before installing one. A few key disadvantages include higher startup costs, increased technical complexity, susceptibility to power and equipment failures, and environmental control challenges:
- Higher initial investment. Constructing or purchasing a full Dutch bucket system carries more upfront costs than simply planting in the ground. There are expenses associated with materials like containers, growing media, reservoirs, plumbing and the supporting structure. Lighting, pumps, timers and other gear also represent an investment. But over time, increased outputs can offset costs.
- Increased technical complexity. These systems require specialized knowledge around topics like nutrient mixing, pH management, hydroponic best practices and electronic equipment maintenance. While commercially available mixes simplify nutrients, monitoring and adjustments is still a requirement. Technical aptitude, research or expert guidance is beneficial when getting started.
- Susceptibility to critical failures. Dutch bucket gardens depend on consistent electricity, proper mixing of reservoir nutrients and functioning gear like pumps, lines and floats. Power outages, depleted nutrient tanks, broken pump impellers or flooding can quickly lead to plant damage or losses if not addressed immediately. Redundant systems provide backup.
- Difficult environmental control. A greenhouse or enclosed indoor space is needed to prevent rainfall from diluting carefully optimized nutrient solutions in Dutch bucket systems. Challenges like maintaining ideal temperatures or humidity levels exist in any indoor gardening. Lighting requirements also lead to higher energy costs. Backup power generators combined with HVAC and humidity control equipment can mitigate environment risks.
The Main Components of a Dutch Bucket Method

A Dutch bucket hydroponic system relies on just a few key components working in harmony to cultivate thriving, high-yielding plants. These essential elements include the reservoir, pump, drain pipes, fill tube, growing media, and the buckets themselves.
Reservoir
The reservoir serves as the lifeblood of a Dutch bucket system, housing the nutrient-rich solution that feeds the plants. Typically made of plastic or other non-reactive materials, Dutch bucket reservoirs hold from 20 to 35 liters of water containing all the essential macro and micronutrients plants need.
Growers can use commercially premade formulas or mix their own solution if properly diluted and pH balanced. Float valves help automatically maintain full reservoir levels. Larger systems may have one central tank for all buckets, while smaller setups might use independent reservoirs for each bucket.
Pump
Drawing up nutrient solution from the reservoir, pumps deliver it to the buckets’ fill tubes where it can drain through to the plant roots. Submersible pumps are commonly used for their ability to operate fully immersed in the tank water. With flow rates between 100 and 300 liters per hour, these fuel-efficient pumps run only as needed.
Installing a secondary backup pump provides redundancy in case the main pump fails, preventing interrupted delivery. Using a timer keeps nutrient solution flowing on a consistent schedule.
Drain Pipe
Excess nutrient solution trickles back down through the media into a drain pipe that returns it from each bucket or series of buckets into the reservoir for recycling. This closed-loop conservation of water and nutrients boosts the system’s operational efficiency.
Drain pipes must have adequate diameter to handle maximum flow volumes without overflowing or creating back pressure on pumps. Some setups combine both fill tube and drain into one larger pipe. Proper slope angles allow smooth gravity drainage.
How to Start Growing in Dutch Buckets?

Installing a thriving Dutch bucket system requires planning, an understanding of how the components interact, and attention to critical factors like lighting and ventilation. Follow this step-by-step guide when setting up your first system for the highest chances of success.
Select a Safe Location
Choosing an appropriate spot is the crucial first step for your Dutch bucket hydroponic garden. An enclosed greenhouse or indoor room with electrical outlets allows control over conditions like sunlight, temperature and humidity. Ensure adequate structural support for the weight of filled buckets. Level ground or strong shelving improves stability. Locate near a water source to simplify filling reservoirs. And pick a space with room to access all sides for maintenance and harvesting plants.
Check your prospective Dutch bucket location for potential safety hazards. Keep away from excessive moisture that can lead to electrical issues. Avoid direct sunlight, which can overheat reservoirs and equipment. Ventilate the space for humidity control and bring in fresh air to prevent disease. Strategically place emergency cut-offs for water and electricity in case quick shutdown is ever needed. Include a backup generator among safety essentials to maintain optimal nutrient delivery.
Purchase Required Materials
Once you settle on a space, compile all the components needed — reservoirs, pumps, fill tubes, drain pipes, growing media like expanded clay pellets, buckets with lids, a base or rack for holding buckets, tubing, testing supplies, seeds or starter plants and nutrients. Consulting a Dutch bucket system guide helps identify reputable products. Shop early to have everything ready for setup day.
In acquiring gear, don’t cut corners on critical elements like growing media, lighting or nutrients. Low quality parts fail quicker. Pay special attention to the capacity and flow rate specifications on pumps and drain piping suited for your planned bucket quantity. Consider acquiring extra replacement items that wear over time, like pump impellers. Test that all electrical devices function before installing.
Arrange Materials
Mark out where different parts of the system will physically sit in the space for the most efficient flow before deployment. Set reservoirs near an outlet to run pumps and float valves. Situate drain pipes to slope downward into reservoirs. Leave room between rows of buckets to move freely and reach plants for care or harvesting. Follow manufacturer instructions for safe installation of all electrical and pump systems.
In mapping out your design, factor ease of use and ergonomics. Position reservoirs, controls and testing kits at a convenient height to avoid excessive bending. Ensure the nutrient delivery layout meets recommended tubing lengths and tube hole counts for optimal flow rates to each bucket. Drive stability by evenly distributing weight across shelving units. Leave a central aisle for accessing plants and moving harvested crops.
Make All the Connections
With all Dutch bucket components arranged in their final locations, it’s time to connect them together into an integrated system. Follow each manufacturer’s instructions carefully during this process. Cut tubing at proper lengths to link buckets to drain pipes, fill tubes and back to reservoirs. Securely fasten all tubing to prevent leaks or pops. Ensure adequate slack for some flexibility.
Double check every connection you make in the system. Attach drain pipes correctly at a downhill angle into reservoirs. Affix fill tubes securely while allowing their spray heads full range of motion to disperse nutrient solution. Utilize quality hose clamps at every junction, or risk dangerous leaks developing later. Keep tubing away from direct sunlight to avoid algae growth inside that can clog flows. Label different lines and drain pipes by bucket row.
Run a Test
Before planting any seeds or clones, test the Dutch bucket setup end-to-end. Fill reservoirs with plain pH balanced water. Initiate pump circulation, observing flow rate and watching for leaks. Check that fill tubes rotate freely and evenly distribute solution into each bucket’s growing medium. Monitor drainage through pipes back into reservoirs.
Use this dry run to validate your system design and make final tweaks. Identify any slow draining buckets indicating pipe angles need adjustment. Ensure all buckets receive equal nutrient solution flows. Make small repairs like tightening leaky joints now before roots establish. Document flow rates from reservoirs to better calculate future circulation schedules. Finally, disinfect the system using diluted bleach to eliminate pathogens before introducing plants.
Add Grow Medium
With a proven circulation system ready, it’s now time to add the inert growing medium into buckets. Expanded clay pellets are a common choice for their manageable size, strength, and pore space to aerate roots. Rinse media first to remove dust. Load each bucket’s growing pot or basket with pellets, leaving the top inch or two empty. Arrange top layers smoothly to allow even distribution of nutrient solution.
Add supplemental media only once plants mature, if roots fully occupy buckets. Discard and replace old media displaying salt buildup or signs of disease. When switching crops, sterilize buckets using bleach, a weak acid or hydrogen peroxide before refreshing media. Amend new batches with beneficial bacteria or mycorrhizae to protect young roots. Record media volumes and changes per bucket to improve consistency across growth cycles.
Construct Plant Support System
Once growing media fills the Dutch buckets, erect structures inside to support plants as they mature. Tomato cages, trellises and fabric slings effectively anchor taller crops, preventing toppling from wind or heavy fruit. Match these supports to specific crop growth habits.
For vining plants like peppers and cucumbers, install durable vertical strings within buckets. Use non-toxic metal or bamboo posts between buckets for heavier fruiting plants to vine along horizontally. Position and secure supports early before extensive root growth makes adjustments complicated. Check supports regularly for stability as crops bear more weight. Be prepared to add secondary reinforcing crosses or guy wires if needed between primary supports.
Transplant Seeds or Seedlings
With a safe, supportive environment established, transplant germinated seeds or young seedlings into the grow buckets. Gently separate and select only the healthiest starts with well-established roots for the highest survival rates after transplanting. Follow spacing guidelines, leaving enough area for mature plant diameters.
Dig shallow holes in the center of each bucket’s growing media before setting seedling roots into place. Fill buckets no more than 2/3 full during early growth stages. Cover all roots thoroughly with media, gently firming it around stems with your hands before watering plantings. Install drain pipe screens to keep loose media contained while allowing fluid flows. Transplant swiftly to minimize root shock and distress to young plants.
Add Nutrient Solutions
Dutch bucket gardening depends on dialed-in nutrient solutions perfectly balanced for each crop’s needs. Ease plants into your feeding regimen, starting with diluted mixes for vulnerable new roots. Routinely test and adjust EC, pH and ppm levels once circulation commences. Increase solution concentrations gradually as plants grow bigger and roots colonize buckets.
Closely follow recommended strength levels on commercial nutrient mixes tailored for hydroponics. Or carefully formulate your own custom blends if adding supplements. Ensure adequate calcium, magnesium and micronutrients are included along with essential N-P-K macros. Always mix fresh solutions in clean reservoirs to reduce risks of algae or pathogens accumulating. Keep close records of reservoir chemistry changes.
Most Suitable Plants for Dutch Bucket Hydroponic Culture
The highly controlled Dutch bucket environment suits a variety of fast-growing fruiting and leafy crops that can thrive with their roots constantly immersed in oxygenated nutrient solution. Some top plant varieties include:
- Lettuce and salad greens. Crisp head, oakleaf, romaine and other lettuce varieties grow well clustered together in Dutch bucket systems. Their shallow roots absorb nutrients quickly, leading to tender, lush leaves. Lettuce matures rapidly, allowing multiple harvests per year. Popular companion greens are arugula, kale, spinach and chard.
- Cherry, roma and beefsteak tomatoes produce abundantly in Dutch bucket culture. Support cages or trellises anchor the vigorous vines in place as fruits swell. Dial in ample calcium, potassium and phosphorus levels for strong tomato growth. Ensure consistent moisture levels and even nutrient flows for best flavor.
- Prolific Dutch bucket pepper plants need good airflow circulation to prevent fungal diseases in this humid environment. Grow hot pepper varieties for higher vitamin content. Prune peppers early on for bushier growth and increased yields. Monitor EC closely as peppers are sensitive to salt buildup.
- Numerous herbs appreciate the constantly moist, nutrient-dense conditions provided by Dutch bucket systems. This includes basil, parsley, oregano, thyme, sage, rosemary and cilantro. Check growth habit and root depths when arranging mixed herbs. Cautiously dose nutrients to avoid over-fertilization.
- Prolific vining cucumbers thrive when provided trellises for support in Dutch bucket setups. Steady calcium levels produce straight, strong fruits. Ensure consistent moisture to avoid bitter taste. Pick cucumbers young and often to encourage more blossoms. Choose disease-resistant, gynoecious hybrids for high yields.
- Given proper lighting conditions, ever-bearing strawberries yield sweet, nutritious fruit nearly year-round in Dutch bucket gardens. Use raised buckets or stacked rows for easy picking access. Test and adjust acidity levels for optimal strawberry flavor. Propagate new starter plants from runners.
Grow Medium Selections for Dutch Bucket Systems
Choosing an appropriate inert growing medium is key for healthy, productive plants in a recirculating Dutch bucket hydroponic system. Quality media properly buffers roots while facilitating air, moisture and nutrient delivery. Top media options include:
- Expanded clay pellets. These porous, round pellets provide excellent aeration and drainage thanks to their honeycomb structure. Clay pebbles come in various sizes from 4mm up to 18mm. The larger grades make rewetting media easier, while smaller grades offer more surface area for root contact and nutrient adhesion. Rinse pellets well before use to remove fine dust.
- Spun from molten rock and steel slag, water-retentive rockwool releases minerals to plant roots as it slowly breaks down. Its rigid structure resists compression from heavy crops. However, rockwool does not buffer pH fluctuations well. Pre-soak and wash rockwool before use to draw out excess salts and adjust pH levels closer to neutral.
- Coconut coir. It offers a sustainable, renewable media option as a byproduct of coconut harvesting. Its high cation exchange capacity helps buffer pH shifts. Coir retains moisture well while still permitting ample air circulation. Processing methods vary, so test different product absorption rates and pH levels before committing to a brand.
- This porous, neutral mineral provides a lightweight and inexpensive media option. Mix perlite with other growing media to increase aeration and drainage, since perlite dries out rapidly on its own. It does not directly supply nutrients, but perlite is useful for cutting heavy media like clay pebbles. Rinse perlite thoroughly before use to remove accumulated dust.
- Mica mineral shards accordion out when heated to create vermiculite’s porous structure, ideal for retaining both moisture and nutrients. It helps buffer pH, but is not as durable as other options. Avoid packing vermiculite too densely around plant roots so as not to inhibit oxygenation. Always rinse before using to remove mineral buildup that can negatively impact pH.
- Brick Shards. Fragments of deconstructed earthen clay bricks lend further weight support for vining plants or heavy fruiting crops. Unlike expanded aggregates, brick shards do not breakdown over repeated crop cycles. Biochar is produced through pyrolysis that increases porosity for added moisture retention, nutrient adhesion and microbial activity boosting root development. Use brick to augment other media mixes.
FAQs
Is it expensive to construct Dutch bucket system?
The main costs for a Dutch bucket system are the containers, growing media, nutrient supplies, water pumps, plumbing like fill/drain tubes and pipes, and any supplemental lighting. Small starter systems for a few buckets can be under $300. Larger custom setups with dozens of buckets typically range $2,000 to $5,000 or more. But they can pay back long-term via increased yields and efficiency.
What is the recommended fill level per bucket?
For mature plants, fill Dutch bucket growing containers with media about 3/4 full, leaving 3–6 inches of empty space at the top. This allows room for adding media as roots expand down over successive growth cycles. Avoid filling buckets completely, or it can lead to waterlogging.
How often should I water the plants?
The great advantage of Dutch bucket systems is they automate consistent nutrient solution delivery direct to the root zone multiple times daily through the fill tube without manual watering. Use submersible pumps and timers to schedule circulation for 15 minutes up to an hour 2–5 times per day depending on system size and plant growth stages.
Can I use Dutch bucket for aquaponic systems?
Yes, it's common to leverage Dutch bucket setups as the hydroponic component in aquaponic systems. Plant roots filter nutrient-rich water from aquatic fish tanks that would otherwise require changing. You may need one or more intermediate sump tanks for solids removal between the fish and clean Dutch buckets.
Is cocopeat suitable as grow medium in Dutch buckets?
Coconut coir, or cocopeat, can work well as a primary or component growing media for Dutch buckets. Its moisture-retention helps buffer roots against temporary pump outages. Cation exchange manages pH shifts, too. Mix with additional aeration media like perlite or clay pebbles. Rinse cocopeat thoroughly before use to remove accumulated salts.
Is recirculation needed in a Dutch Bucket system?
Yes, recirculating nutrient solution is an essential aspect of Dutch bucket hydroponics for conserving water & nutrients and protecting root systems. Drain pipes return used solution to reservoirs for reuse rather than disposing excess drainage liquids. This closed-loop approach allows close monitoring of pH, EC and nutrient levels for precise crop control.


 Hydroponic System")
 - Tutorial")


Leave a Reply