Indoor gardening is becoming increasingly popular, allowing anyone to grow plants, herbs, and vegetables year-round. A grow tent provides an enclosed, controlled environment ideal for growing a wide variety of plants. From tomatoes and peppers to leafy greens and herbs, a grow tent makes it easy to cultivate an indoor edible garden. Grow tents are also commonly used for growing cannabis and other plants. Perfect for small spaces, a grow tent lets you fully customize the indoor growing environment to maximize yields.
Setting up a grow tent may seem complicated for the beginner, but following key guidelines makes the process straightforward. A proper grow tent setup supports plant health by controlling lighting, ventilation, humidity, temperatures, airflow, and other environmental factors. In this comprehensive guide, we walk through every step of planning, assembling, and configuring a grow tent system tailored to your specific plants and growing goals.
What Is a Grow Tent?
A grow tent is a portable, fabric-based enclosure used for indoor gardening and plant cultivation. Grow tents allow gardeners to create a controlled, customizable environment for growing a wide variety of plants. They provide an enclosed space ideal for efficiently nurturing plants while protecting them from external factors.
The main structure of a grow tent is comprised of strong, light-proof outer canvas or polyester sheeting built over a supporting frame. High-quality grow tents utilize durable, double or triple-layered canvas to ensure light does not penetrate the tent. Metal poles, bars, and connectors make up the interior skeleton to keep the tent upright and stable.
Grow tents come equipped with reflective Mylar or plastic lining on the interior tent walls and ceiling. This reflective surface maximizes light efficiency and distribution when specialized grow lights are used inside the tent. The interior reflective lining also helps retain heat while blocking external light.
An entrance is located at the front of the tent, sealed by durable zippers with flap overlays. These zippered door flaps and ventilation ports equipped with sleeves and secure coverings prevent light leakage. Most grow tents range in size from 2×2 feet up to 10×10 feet or larger to support gardens of all sizes.
The main benefit of using a grow tent is having full control over a plant’s enclosed environment. Grow tents allow complete customization and optimization of factors like lighting, humidity, ventilation, nutrients, grow mediums, and more to create ideal growing conditions. Grow tents provide flexibility over grow room setup through their ability to modularly connect components like fans, filters, grow lights, and other equipment. Temperature, humidity, and lighting can be perfectly dialed in and automated with environmental controls.
- LED lights specialty manufactured by VIVOSUN with Samsung LM301 diodes for FULL spectrum light
- The industries most durable grow tent – heavy duty 1680d oxford cloth
- Money & energy saving complete home grow tent kit
Benefits of Using a Grow Tent
Transitioning your gardening indoors comes with many advantages unique to grow tents. These fabric enclosures engineered specifically for plant cultivation provide a self-contained environment with benefits reaching far beyond traditional gardens.
From increased yields and year-round harvests to built-in pest control and easy cleaning, grow tents confer numerous benefits that amplify gardening success:
- Low budget. Setting up a grow tent is significantly cheaper than building a permanent grow room or greenhouse. Tents provide an inexpensive enclosure ideal for small and moderate growing spaces. Complete grow tent setups are available in a range of budgets for under $100 up to $800. Investing in a quality tent designed for growing can yield higher value harvests over time.
- Grow tents offer a flexible, modular design, making them extremely adaptable. Tents can be easily assembled, moved, or reconfigured to meet changing space and plant needs. All required grow equipment conveniently fits inside the tent’s fabric walls. Portability and customization make grow tents convenient for urban, storage spaces and discreet growing.
- Pests control. The enclosed environment of tents naturally deters infestation from common plant pests. Zippers, flaps, and sleeved ports prevent bugs from entering, while filters stop airborne spores. Any infestation inside remains safely contained for treatment. Regular cleaning between grows prevents future pest problems within the protected tent space.
- Temperature and humidity control. Grow tents allow stabilization of temperature and humidity levels optimal for plant growth. Interior plastic lining, flaps, and negative pressure ventilation retain heat while preserving moisture. External vents, fans, and exhaust systems prevent overheating and remove excess humidity. Environmental controllers automate temperature and humidity maintenance for peak growing conditions.
- Correct ventilation. Negative pressure ventilation systems steadily circulate fresh, filtered air through the tent. Oscillating fans evenly stir the enclosed air to strengthen plant stems. Proper airflow removes hot air and humidity while providing vital CO2 to plants. Ventilation ducting connects directly to in-tent fans and filters to eliminate odors.
- Harvest any time. The consistent indoor conditions provided by grow tents empower gardeners to harvest multiple crops year-round. Grow tent cultivation defies outdoor growing seasons and unpredictability. With precise lighting and climate control, fruits, vegetables, and herbs can be harvested perpetually. Indoor gardening enables the production of harvests during any season.
- Cleanliness support. The thick tent canvas traps heat while containing loose dirt and debris. Waterproof floor trays prevent spills and leaks from causing messes or mold. Negative pressure airflow directs dust downward through pre-filter sleeves before venting outward. Keeping mess contained makes cleaning between grows easier, supporting garden hygiene.
- Easy to use aeroponic system for your home
- Fan - Grow Lettuce, Herbs, Veggies & Fruits
- Grow smart & eat healthy, 20 gallon water reservoir Grow Tent, LED Grow Lights
Types of Grow Tents
Grow tents are available in different types designed to meet unique growing needs. Key differences distinguish the wide variety of grow tent styles in terms of their interior lining, reflectivity, automation capabilities, light proofing abilities, and suitability for specific cultivation methods.
Determining the attributes most critical for your garden helps narrow the types of tents worth considering:
- Reflective grow tents. Reflective grow tents contain a silver PET film interior lining that reflects light back towards plants. The reflective walls help evenly distribute intense grow lights to prevent hot spots. Reflective models work well for higher light plants like vegetables and flowers. These tents can use lower powered lights while still maximizing usable light exposure.
- Non-reflective grow tents. Non-reflective tents forgo the reflective material lining, opting instead for a solid black or white tent interior. They cost less, but do not reflect light as effectively as reflective tents. These darker color interiors make monitoring plants easier for growers. Non-reflective tents may require more powerful grow lights to provide sufficient usable light intensity.
- Mylar grow tents. Mylar tents utilize highly reflective, durable plastic sheeting made of polyethylene terephthalate. This mirror-like tent lining achieves 95% light reflectivity for extremely efficient light use. Mylar reflects both infrared and ultraviolet light, unlike some reflective films. The increased reflectivity means less heat build up and lower cooling costs.
- Smart grow tents. Smart grow tents integrate automation and environmental monitoring systems using built-in sensors. Climate devices track temperature, humidity, CO2 levels and automatically adjust connected equipment. Smart tents let you control lights, nutrients, airflow, and other components from your phone. While more expensive, smart tents simplify growing with self-regulating environments.
- Dark room grow tents. Dark room grow tents completely block all external light during flowering for light-sensitive strains. They utilize thicker canvas with enhanced blackout technology reinforced by blackouts on intakes. Keeping the flowering space devoid of light maintains strict dark periods for improved quality and potency. These tents cost more but deliver premium blooms.
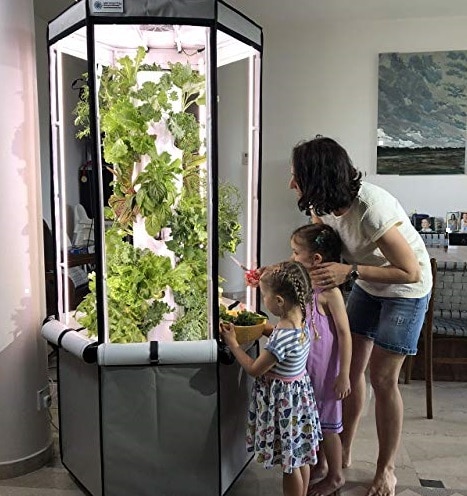
- Hydroponic grow tents. Hydroponic grow tents provide optimal indoor gardening solutions for soilless cultivation methods. They include wide tray bases to install hydroponic systems directly inside the tent floor. Ports situated at the base allow tubing and reservoir access outside the tent. Hydroponic tents give stability for water-based growing while containing any leaks or spills.
- Outdoor grow tents. Outdoor grow tents transform patios, balconies, and backyards into concealed growing spaces. Their durable, thick canvas shields plants from outdoor elements like rain, wind, and cold. Outdoor tent frames provide adequate height for taller plants. These tents easily zip open for ventilation and access, making them ideal temporary greenhouse shelters.
Which Grow Tent Size to Choose?
Grow tents are available in a range of sizes to suit the scale of your gardening needs. Determining how much enclosed growing area you require depends on factors like the number of plants, garden layout, equipment fitting inside, and desired plant size. Evaluate dimensions not just by total area, but also in terms of optimal height and accessibility when choosing a properly sized tent. Common sizes to consider are:
- 2×2. It offers the smallest footprint, perfect for gardeners with limited space to spare. 2×2 tents adequately support 1-4 small or medium plants like herbs and leafy greens. Their compact size fits well in closets, but limits taller plants needing more vertical height to grow. 2×2 tents keep beginnings gardeners’ startup costs lower.
- 2×4. For beginners, the 2×4 feet dimension opens more interior grow space able to handle 4-8 small to medium plants. The elongated shape provides room for shelving and equipment while still fitting in tight spaces. 2×4 tents allow suitable vertical room for plants under 4 feet to develop nicely. This size remains highly affordable and convertible to a nursery or drying tent later.
- 4×4. It provides 16 square feet of growing area capable of managing a more expansive garden. An ideal intermediate size tent, it houses 10-20 typical plants with layout flexibility. The square footage enables adequate height for larger plants while offering more lighting and equipment configurations. 4×4 tents facilitate an ambitious indoor edible garden.
- 3×3. The 3×3 tent delivers a bit more width than the 2×4 model but less length for 9 square feet of space. 3×3 tents conveniently support about 6-12 small to medium plants, with room for a humidifier and fan assembly. The balanced footprint can fit grow lights ideal for canopy coverage without much wasted overlaps. For urban locations and closets, a 3×3 tent optimizes a modest harvest capacity.
- 5×5. Serious home growers appreciate the spacious 25 square feet provided by 5×5 tents. This size can host a small hydroponics system or over 20 larger plants in active flowering and vegetation. The expansive floor plan demands robust ventilation and cooling to match the 400+ watt lighting systems used. 5×5 tents enable harvests supporting personal use and possibly retail sales.
- 10×10. Commercial-grade 10×10 feet tents constitute customizable grow room substitutes for large scale cultivation. These high ceiling tents allow layered rows of scaffolding to support 50+ large plants simultaneously. Their enormous capacity necessitates professional equipment like dual HVAC systems, commercial dehumidification, and high-powered grow light arrays. 10×10 tents facilitate automated hydroponics production capable of commercial distribution.
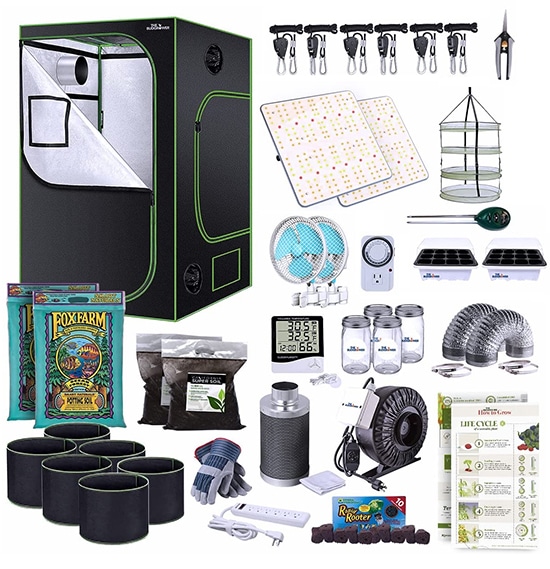
What Should Be Included in a Grow Tent Kit?
Complete grow tent kits contain all the components required to establish an effective indoor garden ecosystem tailored to plant type and environment. Evaluating the fixtures and accessories included determines how comprehensively a bundle facilitates cultivation needs, from illumination to climate control.
Illumination
Proper lighting proves essential to indoor planting, making grow lights the most vital elements in a tent kit. Full spectrum LED grow lights deliver high intensity light frequencies that fuel photosynthesis while running cooler and conserving energy. Kits should contain lighting equipment like LED grow lamp panels, hanging light bars, and daisy chain systems that meld perfectly with the tent’s reflective properties and dimensions.
Grow tent lighting kits should provide sufficient wattage in lamps and fixtures to support the tent’s plant capacity without overloading. For example, a 4×4 tent needs 400–600 watts of full spectrum LED grow light power distributed across multiple panels for safe density. All cables, drivers and plugs must deliver adequate electricity while preventing hazardous overheating and shorts.
Keeping Things Fresh
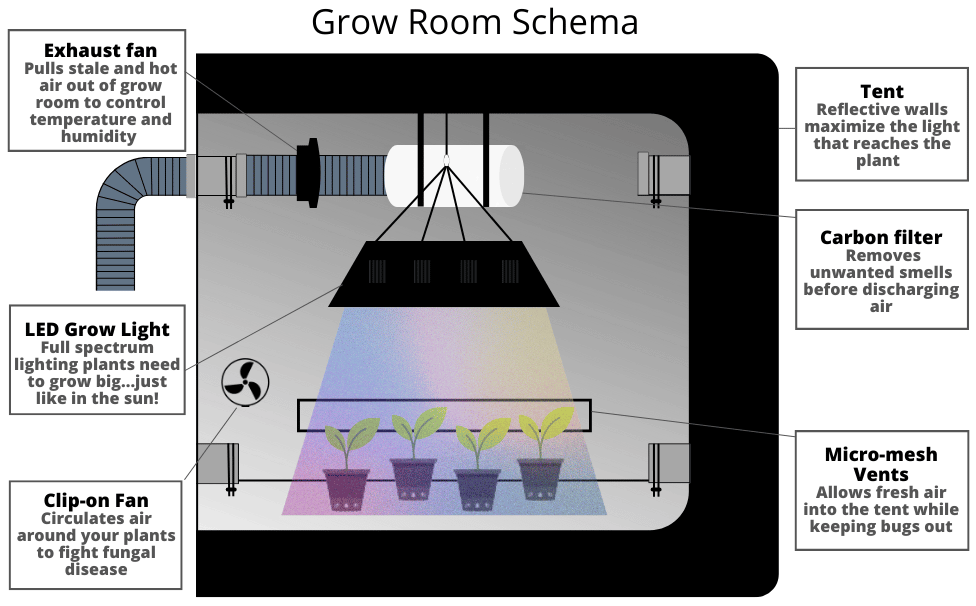
Ventilation and circulation components featured in tent kits preserve fresh airflow while regulating humidity and temperature. An exhaust fan mounted near the top with adjustable speed pulls hot, humid air out. Oscillating tower fans stir the inside air to strengthen plant stems. Ducting, insulating wraps, and passive intakes channel and balance the air flow. Filters attached to ducting or ports scrub contaminants, effectively controlling odor.
Kits also integrate digital thermo-hygrometers for easily tracking temperature and humidity metrics. Some feature automated climate controllers that adjust fixtures to stabilize conditions. Having the right mix of environmental monitoring, ventilation, and circulation products establishes healthy airflow for robust growth.
Climate Control
In addition to lighting and ventilation, kits provide appliances for customized climate control. Humidifiers add moisture during vegetation, while dehumidifiers prevent oversaturation and mold risks in flowering. Programmable timers ensure consistency in the lighting schedule while promoting essential dark periods. For indoor soil planting, the addition of fabric smart pots and spill-proof trays assists maintenance.
Heating mats and fans allow warmth adjustment for cooler weather months, while air conditioners help offset intense grow light heat. Monitor sensor kits also oversight nutrients in irrigation water and growing mediums. Having these appliances bundled in tent kits means achieving optimal, balanced conditions for your plants right from setup.
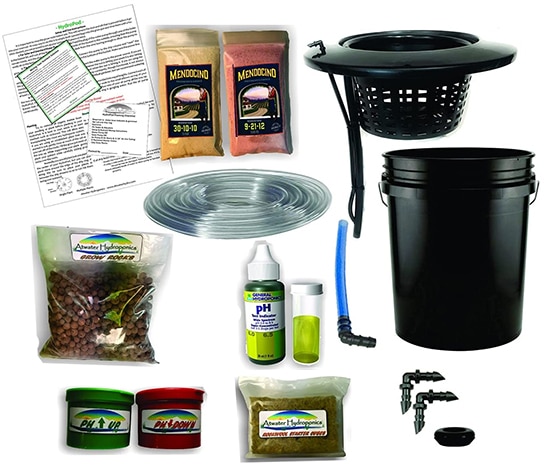
Feeding Your Plants
The ideal nutrients and additives to include in a tent kit depend on the plant varieties and growth phases. Kits feature balanced hydroponic nutrient blends, plant foods, and soil boosters specific to fruiting, flowering and vegetative stages. pH and EC meters quantify acidity and dissolved solid levels, guiding feed amounts. Nutrient test kits indicate when plants require more nitrogen versus phosphorus, potassium, calcium etc.

Kits also provide piping and water pumps enabling automated drip irrigation distribution from an external reservoir. Having a 3-6 month supply of the appropriate fertilizers, minerals, and monitoring tools establishes robust feed cycles.
Plant Pots
Smart tent kits include containers well-matched to the tent’s footprint and ventilation placement. Plastic, felt and fabric smart pots offer durability, stability, and aeration for soil and soilless mediums. Their tapered vertical design encourages healthy root branching untouched by hard plastic walls. Built-in handles simplify relocating plants, while drainage holes prevent waterlogging. Matching drip trays prevent messy spills.

Self-watering planters integrate organic super-soils, supporting 1-2 week feedings. Air pruning pots contain woven panels that stimulate root ramification. Kits optimize pots for sustained health.
Enriching with CO2
CO2 enrichment bundles provide the gas generators, monitors, and distribution components that amplify growth. Elevated carbon dioxide levels accelerate photosynthesis, boosting plant vigor, yields, and potency. Grow tent CO2 kits contain centralized generators running off propane or natural gas to infuse areas up to 10’x10’.
Distribution lines route CO2 securely into tents, while quantification sensors govern ideal 900-1500 PPM concentrations. Timer modulated enrichment synchronized for daylight durations proves most efficient. For maximizing quality and harvest sizes, CO2 systems prove invaluable.

- Most efficient use of water compared to traditional gardening
- Dual outlet air pump, Nutrients are Included!
- Kit contains everything you need to start your own garden (minus plants and water!)
Making Life Easier
Labor and time-saving accessories round out comprehensive grow tent kits. Sturdy hanging bars and netting offer flexible arrangements for lighting, filtration, and components. Shovels and shears ease cultivation tasks, while trimming trays catch stray leaves. Rolling work seats spare backs with cushions and caddies for storing supplies handy.
Tent cleaning kits furnish the scrub brushes, bleach, gloves, and odor neutralizers that simplify disinfection between plantings. Clothing, shoe covers, and towels defend against contamination. Consolidating these helpful implements makes monitoring and maintaining grow tents simpler.
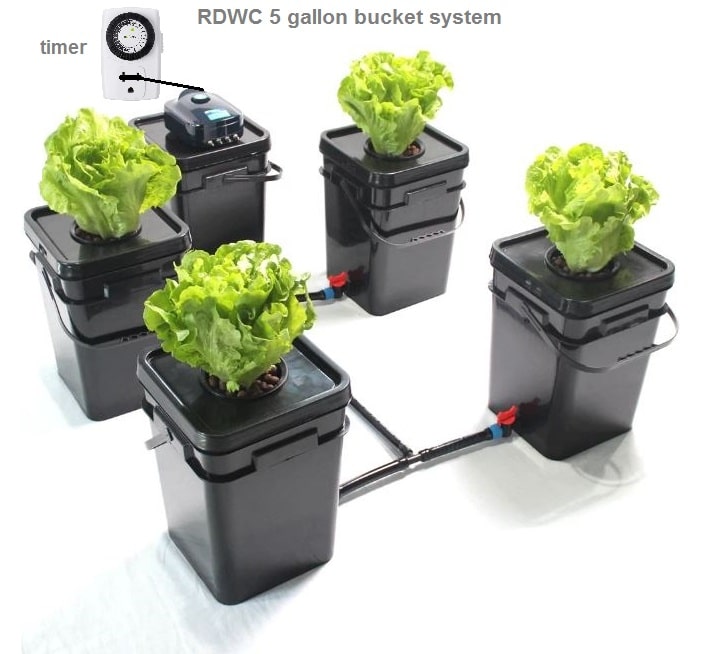
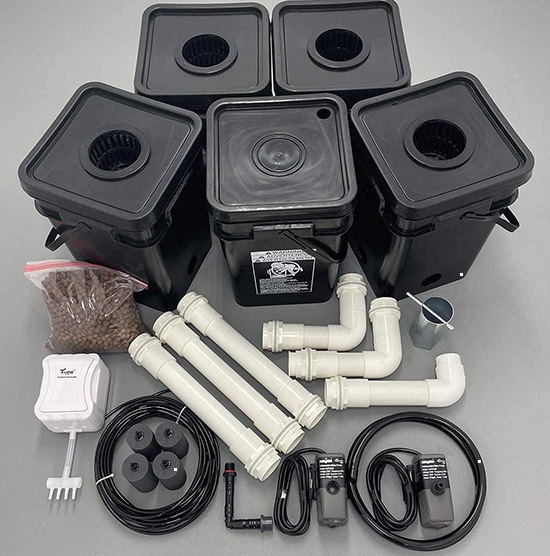
- Reservoir Bucket Connected to 4 Grow Buckets
- 400 Gallon/hour Circulating Pump
- Large 5 gallon square buckets, pre-drilled
How to Set Up a Grow Tent?
Constructing the optimal grow tent configuration entails strategic planning and precise execution across setup steps for lighting, ventilation, accessories, and more. Carefully choosing a space and prepping it for installation precedes fully furnishing the environment with equipment that sustains plant health.
Selecting Your Grow Tent Location
The permanent or temporary spot dedicated for erecting the grow tent constitutes the most crucial site-specific planning decision. Convenient locations like garages, closets and spare rooms simplify accessing plants for maintenance while retaining discretion. The area footprint must accommodate the tent base plus extension for ducting and filters. Scout potential locations to ensure sufficient electrical outlets are present to power ventilation, lights and appliances without hazardous overloading.
Also evaluate room conditions including existing temperature, humidity and light levels during both day and night durations. Presence of exterior windows can interfere with strict dark cycles, while environmental readings influence ventilation needs and climate device options. If ambient relative humidity sustains 60-75% RH, consider a dehumidifier to prevent mold issues later. Include room measurements with your equipment purchasing plans for perfect fits.
Gather the Necessary Equipment

Compile all purchased core tent supplies along with secondary accessories specific to your garden goals. Essentials encompass the tent, hanging bars, reflective lining, lighting, main circulation fan, filters, ducting, extraction fan and controller. Nutrients, boosters, potting medium, pots, timers and monitors constitute supplemental gear for dialing in plant health factors. Stage equipment by the setup area before tent construction.
Check light electrical draws against circuit capacity to prevent shorting issues. Have screwdrivers, wrenches and fastener supplies for assembly. Ensure duct lengths can reach wall or window ports where intake, exhaust and cord extensions will install securely. Test fan motor functionality prior to mounting. Lastly, sanitize the grow space using quality disinfectant to deter mold and pests before building out the grow tent ecosystem inside.
Unbox Grow Tent Components
Carefully unpack the tent framework poles, connectors and fabric cover, laying them out logically based on assembly order if available. Inspect for any signs of damage in transit. Slide the top and bottom frame rails through fabric sleeve channels, if present. Many pop-up style tents enable intuitive, rapid construction by interlocking the top rails into the vertical poles, ending with the corner pieces last. Refer to specific tent model instructions as these vary.
With the corner joints secured and cover stretched taught, finish by fastening the fabric door panels. Ensure any window ports or ducting rings lay flat before adding more hardware inside. Finally, use the provided fastening hooks, loops and straps to securely reinforce the entire frame preventing interior collapsing hazards. Avoid pinch points while entering the tent when establishing the basic structure.
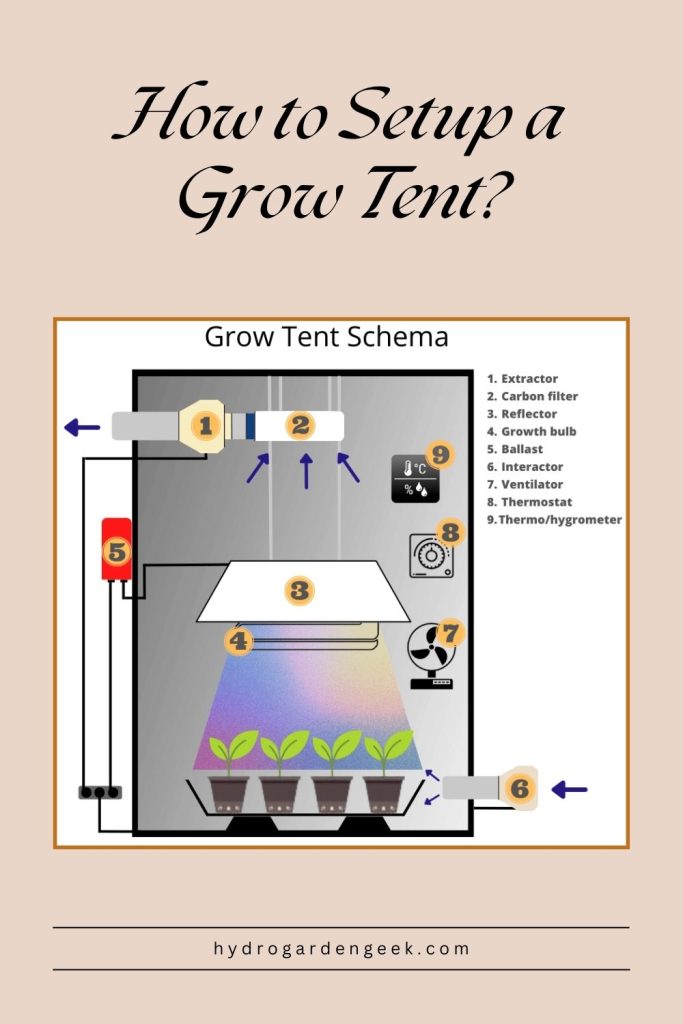
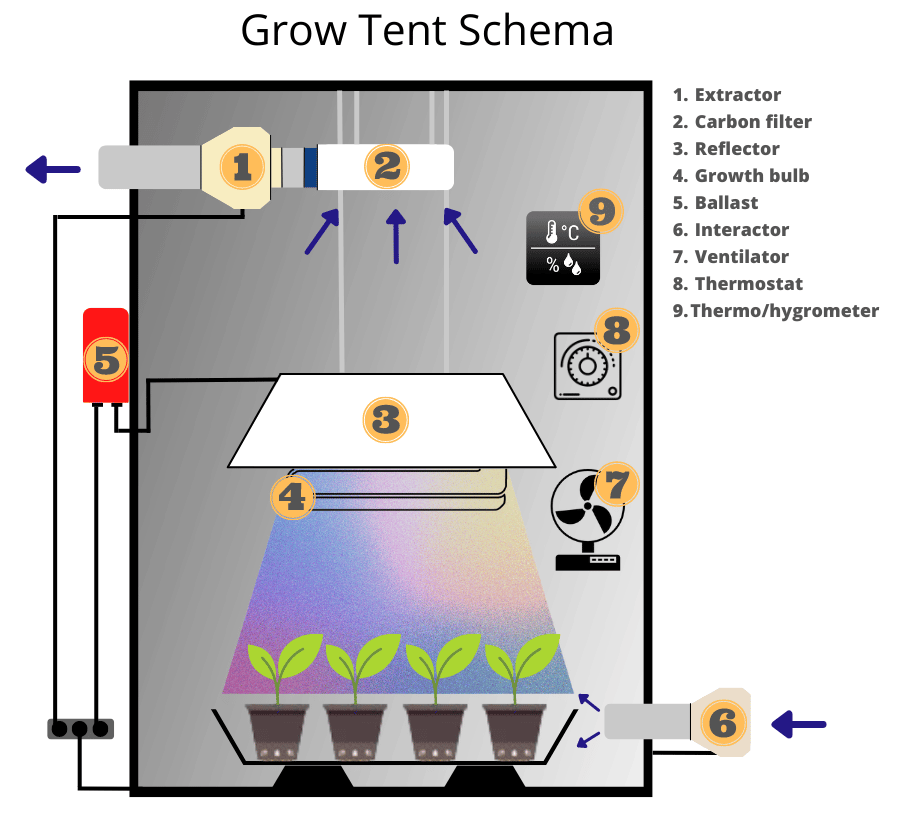
Plan the Ventilation System
Now enclosed within the ceilinged tent space, map out the critical ventilation scheme. Factor in existing window, wall or floor access points for ducting to place the main centrifugal extraction fan accordingly. Position oscillating tower fans for optimal internal air mixing that strengthens stems. Outline hanging filter inside, reflector and ducting routes enabling trapped heated air to exit efficiently. Account for external ventilation blockers like AC units when selecting vent sites.
Most tents position flap-sealed flaps or socks strategically to integrate ducting, filters and find all mounting hardware combinations for securing each component tightly. Place passive air intakes across the lower tent perimeter to balance incoming fresh airflow. Never obstruct vents or fan council accessibility for routine maintenance. Keep duct lengths and bends minimized to prevent flow resistance and noise.
Set Up the Carbon Filter
The key to minimizing unwanted growing odors involves properly installing carbon filtration inside the tent’s ventilation system. Carbon filters contain specialized activated charcoal that actively absorbs odor particles as air passes through. Connect ducting securely from the inline fan to the filter intake, then route the exhaust end ducting out the tent vent port. Use ratcheting clamps or ties to prevent air leaks across connections.
Position the suspended filter towards the top-center of the interior to ensure optimal airflow across the entire garden space. Allow sufficient headspace beneath to tend plants comfortably. Let the filter dangle freely to prevent added vibration noise. Pairing the filter with an appropriately sized, variable speed fan enables tuning filtration performance to life cycle odor levels. Replace filters every 2-3 regular grows as charcoal becomes fully saturated.
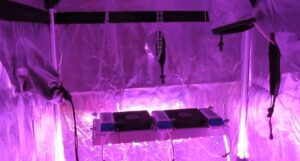
Mount the Grow Lights
With ventilation established, strategically mount your grow light panels, bars or high intensity bulbs centered above the tent floor print, optimizing illumination coverage. Confirm manufacturer recommended hanging heights to prevent light burn, then adjust between 18–40 inches throughout plant development. Secure light transmission cords safely along provided tent ropes towards reliable outlets without creating trip hazards.
Use durable ratchet hangers on frame posts for simplified repositioning to evenly distribute canopy intensities measuring ~800 PPFD. Invest is oscillating pendant fixtures to improve side exposure and minimize shade gaps from a static placement. Daisy chain appropriate wattage extensions to power banks to prevent overloading circuits. Keep all cables and drivers away from contact with foliar moisture, eliminating electrocution and fire risks.
Connect the Light and Fan Time
Connecting environmental control devices enables automating the tent ecosystem’s critical lighting intervals and ventilation rates synchronized to growth stages. Use a multi-prong outlet splitter to supply power to all accessories from a single 15+ amp circuit. Plug fans, lights and appliances into separate timers with grounded surge protection. For 18 hour vegetative lighting cycles and 12 hour flowering periods, simply program timers accordingly.
Install thermostats like Inkbird controllers with temperature and humidity probes inside the tent to override fans for precision climate regulation. Use light timers offering 30 minute ramp up/down for gradual daily light acclimation. Connecting timers streamlines efficient operation across cultivation phases, preventing stressful light shock or sweltering heat from constant fan speeds inappropriate for seedlings and clones.
Expand Your Garden

Once establishing a fully functional grow tent, expansion potential exists by daisy-chaining compatible models for augmenting capacity. Certain grow tent brands provide modular interconnecting frames using stabilizing crossbars secured by corner angle braces between adjacent tents. Multi-chamber tents with removable dividing walls also enable segmented spaces that can merge when needed.
Expanding may demand upgrading ventilation to larger fans and ducting to match bigger spaces. Increase electrical capacities too by using heavier duty extension cords from new 20 amp circuits to supply additional lighting draws. With twice the footprint, install secondary automatic climate controls to balance conditions roomwide. Use the flexibility of grow tents to scale production in phases.
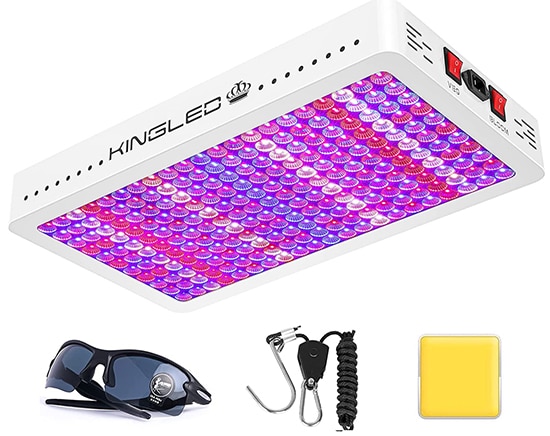
- Coverage Full Spectrum Grow Lights
- For Indoor Hydroponic Plants Veg Bloom
- 3 years Professional Service and free return for 90 days
FAQ
What is the recommended number of plants for a 2x4 grow tent?
A 2x4 grow tent can adequately support 4-8 small to medium-sized plants. The elongated footprint provides enough interior length and width for this moderate plant capacity with room left over for small fans, humidifiers and other gear.
Is it necessary to run a carbon filter all the time?
No, it is not necessary to run a carbon filter at all times. Carbon filters mainly become critical during the flowering stage, when plants produce terpenes, leading to stronger odors. Filters can be turned off during early vegetation growth when odor production remains minimal. Just ensure to run filters whenever substantial smell occurs.
Should ventilation fans remain on when the grow lights are off?
Yes, ventilation fans should remain on 24 hours a day throughout all growth phases. Consistent air circulation preserves a healthy level of air exchange, bringing in fresh CO2 and removing ethylene gas even without lights on. Fans prevent humidity build up while plants respire overnight as well.
Is a 300W LED lamp sufficient to cultivate a single plant?
Yes, a 300W full spectrum LED grow light proves sufficient for cultivating a single mature plant. For one larger or high light strain plant, distribute this wattage using a panel overhead and secondary side lighting to provide comprehensive intensity exposure across the entire plant.
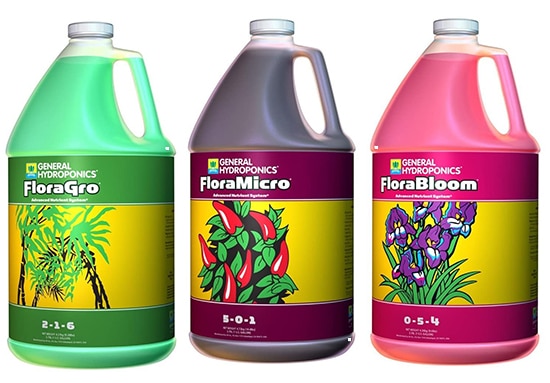
- Сomplete nutrient system
- Highly purified concentrates for maximum solubility
- NASAAntarctic research scientists choose flora series!