Proper ventilation and air circulation is a critical, often overlooked necessity for thriving indoor gardens. Stale, humid air breeds disease, encourages pests, and reduces yields. Without ventilation, plants don’t receive the gas exchange needed for photosynthetic processes and overheat from intense grow lights. Yet, ventilating enclosed grow tent environments poses unique challenges for getting fresh airflow to plants.

This complete guide covers the key components and best practices for setting up ventilation for grow tents. Topics span airflow calculations, equipment recommendations, filter options, ducting basics, controller automation, and tips for improving any existing system.
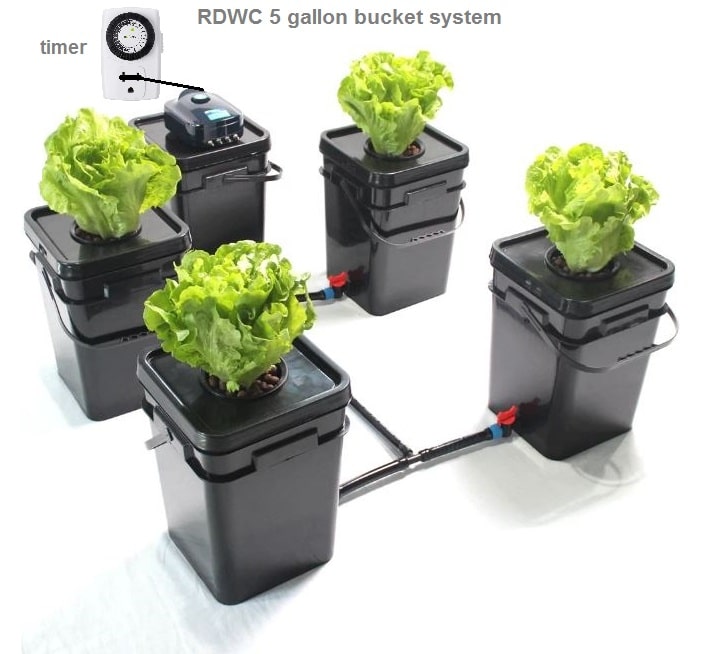
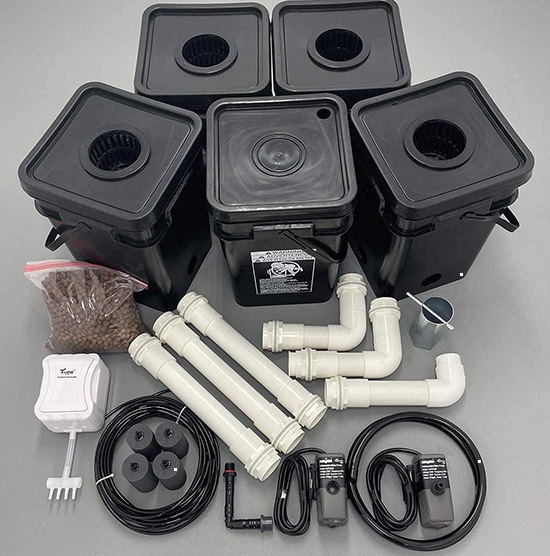 Recirculating Deep Water Culture (RDWC) Hydroponic Grow Kit System
- Reservoir Bucket Connected to 4 Grow Buckets
- 400 Gallon/hour Circulating Pump
- Large 5 gallon square buckets, pre-drilled
Why Ventilation System Is Important for Your Grow Tent?
Proper ventilation serves multiple mandatory functions for protected growing environments like tents. While advanced systems can get complex, all good designs fundamentally handle three core needs:
- Regulate humidity. The moisture released from plants and growing media creates a sauna effect inside non-ventilated spaces. Excess humidity slows transpiration, breeds diseases, encourages pests, and interferes with nutrient uptake. Active exhaust fans and passive air intakes balance fresh, drier outside air with internal tent humidity for optimal 40-60% RH levels.
- Remove heat buildup. Intense grow lights, ballasts and electrical equipment dump substantial heat inside grow tents. Without venting out hot air, temperatures rapidly spike well above room temps and damage plants. Multi-speed fans and open mesh panels flush heat while equalizing external and internal tent temperatures for ideal growing.
- Manage wind pressure. Non-ventilated tents balloon outwards as expanding warm air tries to escape. This places stress on tent seams, zippers, poles and plants themselves. Equalized pressure from constant airflow regulates this expansion wind force on fragile structures. Ventilation keeps the tent neutral for calm, natural air movement over leaves.
- Control CO2 levels. Photosynthesis relies on leaf uptake of atmospheric carbon dioxide levels averaging 400 ppm. Sealed tents quickly deplete CO2, which limits plant growth. Ventilation systems balance and maintain desired concentrations through air exchange with ambient conditions. Many integrate CO2 supplementation and controllers for optimum 1500 ppm enrichment.
- Deter pests and diseases. Stagnant air allows mold spores, bacteria, and insects to readily proliferate to dangerous levels. Constant airflow disrupts reproductive lifecycles, while lower humidity and fluctuating zones deter infestations. Ventilation physically removes pathogens and pests before they multiply into full-blown outbreaks.
- Heat control. Expanded growth in maturity means more lush foliage for light interception. Dense leaves easily overheat without vigilant heat extraction. Strategically placed ventilation combats escalating heat loads over time and prevents plant stress or tissue damage during the critical flowering stretch.
- Plant stems strength. The gentle brushing and winding forces from directional airflow stimulates hormonal responses for thicker, tougher stalks and stems. Ventilation systems create plant movement, which dynamically stresses cell growth for better structural reinforcement compared to still air.
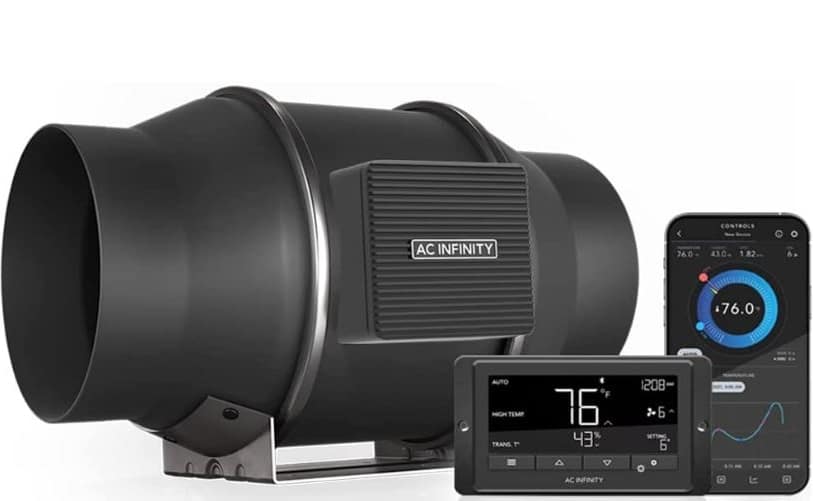
AC Infinity CLOUDLINE T6, Quiet 6” Inline Duct Fan
- with Temperature Humidity Controller, Bluetooth App
- Ventilation Exhaust Fan for Heating Cooling Booster
- Grow Tents, HydroponicsDuct Size: 6” | Dimensions: 7.9 x 12.6 x 8.4 in.
Required Components of Ventilation System
While ventilation techniques differ, all enclosed garden grows need a basic set of components to facilitate adequate airflow. Systems should draw air from intake vents through the tent, while exhaust fans eject old air outdoors.

Thermostats and Hygrostats
Environmental controllers automatically operate ventilation fans and equipment in response to changing conditions. Thermostats turn fans on at target temps to reduce heat buildup. Hygrostats activate at upper humidity limits to dehumidify tent air. These controllers maintain ideal ranges despite fluctuating exterior environments or seasonal shifts. Choose reliable commercial controllers over cheap, inaccurate models for best results.
Dial in controller set points to create a progressive system. For example, run small fans continuously for air circulation, while big fans only trigger during temperature spikes. This prevents rapid changes that could shock plants. Position sensors properly to get representative environment data — install near the top of canopy level to account for heat and moisture rising from growing plants.
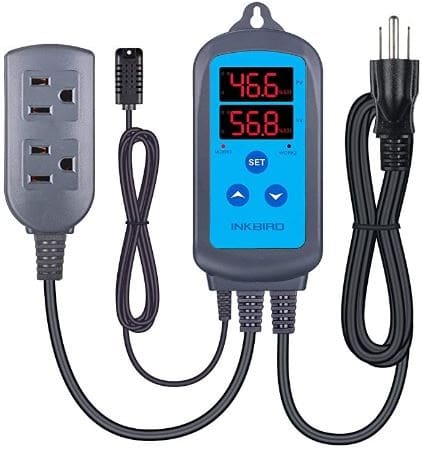
Inkbird Humidity Controller IHC200 Humidistat
- Humidity control range: 5~99%RH; Accuracy: ±3%RH
- Control humidity by setting value and differential value
- Alarm when sensor error or humidity exceeds limit
Equipment for Monitoring
While automatic controls remove guessing work, every grower should self-monitor humidity, temps, CO2 levels and other parameters. Digital readers provide instantaneous data to verify system function and environment viability. Battery-powered data loggers create historical charts, revealing issues over time.
Especially during lights-on, routinely check tents both at plant level and above to catch potential hotspots or cold zones. Compare monitors and humidity sensors in different tent quadrants to detect uneven distribution. Consistently review data and equipment will quickly pay dividends.
Air Exchange
Air exchange forms the beating heart, driving overall ventilation efficacy. Whether passively using negative pressure or actively forcing input air, tents require continual importing and exporting of internal air volumes to thrive. Determine total tent cubic feet and establish a target air exchange rate per hour, typically ranging 5-10X turnover. Oscillating fans improve circulation, while booster fans may be necessary for oversized spaces.
Beware stagnant zones, which can promote disease. Verify smooth, overlapping air currents by feeling movement across the entire canopy using goods strips. Avoid creating strong, direct blasts striking plant tissues, but rather promote gentle oscillation resembling natural winds. For deep commercial-scale tents, complications may require computational fluid dynamics simulations of air velocities and direction changes.
Fan Capacity and Sizing
The workhorse behind healthy air exchange lies in ventilation fan capacities matched appropriately to individual tent volumes. Many online tools facilitate basic CFM calculations but invest in professional HVAC software for commercial operations. As a rule of thumb, base total fan CFM pull on 5-10X the measured cubic footage of growing space, kept around 80°F.
Although oversizing is preferable to compensate for losses, drastically exceeding 10X encourages too rapid removal of desired CO2 and moisture. Periodically verify fan output using smoke tests and anemometers.
Duct Tubesspace
Flexible ducting safely channels airflow driven by ventilation fans into or out of the growing space. Tubes should be sized to properly handle intended CFM without restrictions while limiting noise or heat gains/losses. For rooms, use smooth metal duct tubes with 6-8” diameters or rectangular lengths of rigid channel ducts. Flexible soft polyethylene tubes work well in tents but avoid extreme bends impeding performance.
Duct placement plays a major role in performance. Lightweight input tubes mounted near the bottom provide passive air intake, as rising heat naturally draws fresh air across plants to the upper exhaust. Outflow ducting is generally more rigid to prevent sagging and located higher to purge warm stale air. Some configurations use straight through airflow for faster turnover, while venturi designs create circular patterns up and down plant lines to maximize contact time before extracting air.
Carbon Filters
Exhaust filters greatly improve functionality of enclosed grow tents. Activated carbon pads absorb and neutralize odor molecules from flowering plants that would otherwise compromise discretion. Filters also strip volatile organic compounds (VOCs) and impurities from intake air that might negatively impact flavors. Premium filters use stacked layers of carbon for increased contact exposure and maximum air cleansing.
Properly size filters to air volumes handled or bypass issues arise. Undersized units lead to uncontrolled odor escape, while oversized filters restrict airflow. Reputable models display calibrated CFM ratings, which must exceed fan capacities. Position filters as close as possible to fan intake/exhaust to prevent leakage points. Expect average lifespans around 12 months before requiring replacement. Consider pairing both intake and outtake filters for optimal purification.
Silencers
Silencers, also known as acoustic attenuators, are critical components of ventilation systems. Their role is to reduce noise from the airflow that could disrupt occupants. Silencers are typically installed at the inlet or outlet of fans and blowers.
Silencers are constructed as duct sections with sound-absorbing material inserted into the airflow path. Common materials used are fiberglass, open-cell foam, and steel wool. The silencer housing is also designed to inhibit noise transmission. Effective silencers can reduce fan noise by 15–40 decibels.
Adapting Environmental Factors
Ventilation systems must be designed to accommodate various environmental factors. This includes adapting to different climates and weather conditions. For example, systems installed in hot, humid climates need to be able to provide ventilation air while managing the temperature and moisture content. Additional cooling and dehumidification equipment may be required.
Ventilation systems also need to be adapted for different pollution and contaminant levels. Locations with higher outdoor pollution may need more filtration stages. Industrial sites with chemical contaminants require corrosion-resistant materials and coatings. The occupancy and use of the building should also be considered.
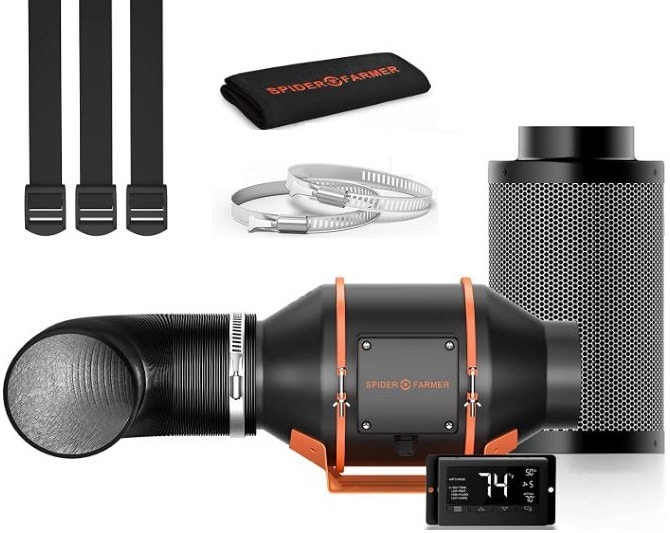
Spider Farmer 4 Inch Inline Fan Carbon Filter Ducting Kit
- Exhaust Fan with Temperature Humidity Controller
- Hydroponics Grow Tent Ventilation Kit
- for Heating Cooling Booster, Grow Tents, Hydroponics
What to Consider When Setting Up a Ventilation System?
Designing and installing an effective ventilation system for an indoor grow room requires careful planning and consideration of several key factors. This section covers some of the main decisions that need to be made when setting up a grow room ventilation system.
Choose Between Active or Passive Air Intake
One of the first choices is selecting either an active or passive air intake. Active intakes use fans to draw fresh air into the grow room. Passive intakes rely on differential air pressure and ventilation shafts to introduce new air.
Active intakes provide greater control over airflow but require more equipment and energy. Passive systems are simpler and cheaper, but ventilation levels can fluctuate. Most growers prefer active intakes for their controllability. Passive intakes may be suitable for small-scale operations.
Determine Grow Room CFM Rating
Another essential step is calculating the required cubic feet per minute (CFM) rating for the grow room. This determines the necessary airflow volume to maintain ideal temperature, humidity, and CO2 levels.
The CFM rating depends on the grow room size, dimensions, lighting, desired environmental parameters, and number of plants. A common estimate is 1 CFM per square foot of grow area. However, an accurate CFM calculation should be performed using grow room data. Oversizing or undersizing the system’s CFM capacity will lead to ventilation problems.
Select Appropriate Fan and Duct Sizing
The CFM rating will dictate the required fan and duct sizing for optimal airflow. Fans should be selected that can provide at least 10-20% greater than the calculated CFM. Ductwork needs to be properly sized to avoid restrictions.
Undersized fans will not be able to meet fresh air requirements. Oversized fans waste energy and may cause turbulent airflow. Improperly sized ducts create excessive resistance and hinder system performance. Consulting ventilation sizing guidelines and manufacturer data is recommended.
Pick a Suitable Duct Material
Growers have several options when selecting a material for ventilation ducts. Common choices include sheet metal, rigid PVC plastic, flexible aluminum, and fabric ducts. Key factors are durability, corrosion resistance, leakproof construction, insulation needs, and cost.
Sheet metal is a standard choice for durability, but needs added corrosion protection from moisture. PVC plastic resists corrosion, but is not as sturdy. Flex ducts are easy to install but prone to leaks. Fabric ducts nicely distribute airflow, but can accumulate dust and mold.
Set a Budget
Creating a realistic budget is vital when planning a grow room ventilation system. Key costs include fans, ducting, silencers, filters, automation controls and installation expenses. Cheaper items often underperform or require frequent replacement. Investing in quality equipment leads to long-term savings.
Adding up component quotes and expected labor costs provides a spending estimate. It helps to research prices and get quotes from multiple vendors. The budget should provide some flexibility to accommodate cost overruns or additional purchases. Setting an appropriate budget avoids financial surprises down the line.
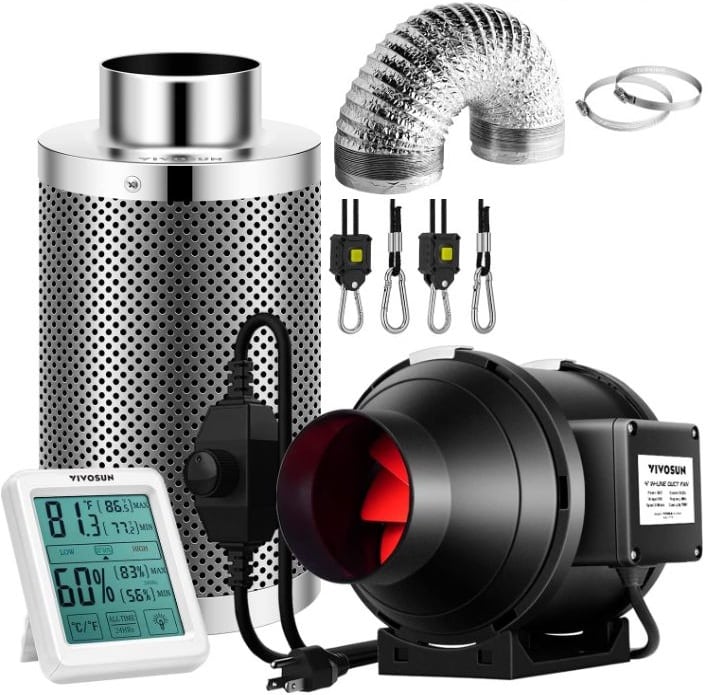
VIVOSUN 4 Inch 190 CFM Inline Fan with Speed Controller
- Temperature Humidity Monitor for Grow Tent Ventilation
- 4 Inch Carbon Filter and 8 Feet of Ducting
- Multi-Layer Air Ducting; 2 Rust-free Clamps;
Grow Tent Ventilation System Set Up Guide
Properly installing a ventilation system is crucial for maintaining a suitable growing environment inside a tent. This guide covers the key steps involved in setting up basic ventilation equipment in a grow tent.
Hang the Carbon Filter
The carbon filter should be hung at one end of the grow tent to scrub odors before air exits the tent. Use provided hanging straps or ropes to securely suspend the filter. Position it vertically to allow free airflow through the filter medium.
Leave space between the filter and tent walls, so air can circulate freely around it. The bottom of the filter should be above the top of the plants to prevent moisture damage. Check that the filter is securely mounted before attaching ducting.
Tie the Rope Hanger
Attach a rope hanger to the ceiling cross-members of the tent at the opposite end from the filter. This will be used to mount the inline fan. The hanger should be taut and capable of supporting the fan’s weight.
Position the rope hanger so there is space to connect the ducting between the fan and filter. Make sure the fan will be suspended appropriately for the ducting to angle downwards into the filter.
Hang the Inline Fan
Once the filter and hanger are installed, the inline fan can be hung from the rope. Secure the fan to the ropes using the provided hanging hardware. The fan should blow air out of the tent through the ducting and filter. Double check that the fan is oriented to pull air rather than push it. Position the fan above the maximum plant height to optimize airflow.
Ensure all hardware and connections are tight before powering on the fan. The fan should now draw fresh air in through tent vents and expel old air out the filter. Monitor the setup and make any adjustments needed to airflow and equipment positioning.
Connect Ducting to Fan
Once the fan and filter are hanging securely, the ducting can be attached to connect them. Start by clamping or securing one end of the ducting to the outlet side of the inline fan. Make sure the connection is tight and properly sealed.
Use metal clamps or ties to prevent air leaks where the ducting meets the fan housing. The ducting should extend from the fan down to the filter. Leave some slack rather than pulling it taut, to allow flexibility. Avoid sharp bends that may restrict airflow.
Tuck Away Excess Rope

After mounting the fan, neatly tuck any excess rope from the hanger out of the way. Loose, dangling rope can get in the way while working in the tent. Coil up any extra length and secure it against a sidewall using tape or hooks. For a cleaner look, trim off any unnecessary rope so just enough remains to suspend the fan securely. Removing excess rope improves aesthetics and organization.
Hang the Grow Light
Install grow lights inside the tent according to manufacturer guidelines. Lighting is often hung from ceiling bars with chains or adjustable hangers. Space lights evenly to ensure adequate coverage across the entire grow area.
Position the lights above the maximum expected plant height during growth. This allows raising or lowering the lights as needed. Ensure electrical cords and connections are secure. Do not turn on grow lights until the ventilation system is fully operational.
Adjust Grow Light Height
After installing the grow lighting, adjust the height appropriately for plant maturity and stage of growth. Seedlings and clones require the lights to be higher up. As plants grow, lights can be lowered to optimize intensity while preventing leaf burn.
Set lights at the maximum height needed for any current plants. Gradually lower the lights in increments, observing plant response and adjusting according to growth stage and manufacturer recommendations. Proper light height is key for plant health.
Maintaining Proper Ventilation
Keeping a grow room’s ventilation system in good working order is essential for managing the indoor environment. Ongoing maintenance helps maximize performance and prevent issues. This section covers key maintenance tasks for proper ventilation.
Ensuring Clean Fan Equipment
Grow room fans accumulate dust, dirt, and debris over time which can clog and coat fan blades. This causes fans to run less efficiently. Regular cleaning keeps fans working at peak performance.
Fans should be visually inspected monthly and cleaned as needed. Wipe down exterior housing and vents using a damp cloth. Use a soft brush or vacuum to remove built-up dust from fan blades, taking care not to bend or damage them.
Replacing Clogged Air Filters

The filters in a grow room ventilation system become clogged with particulate matter from the air passing through them. This restricts airflow and decreases filtration performance. Changing filters regularly is required.
Inspect air filters monthly and replace per manufacturer recommendations, generally every 3–6 months. Clogged filters have higher pressure drops across them. Swap filters immediately if airflow is noticeably reduced. Use the correct size and rating of filter.
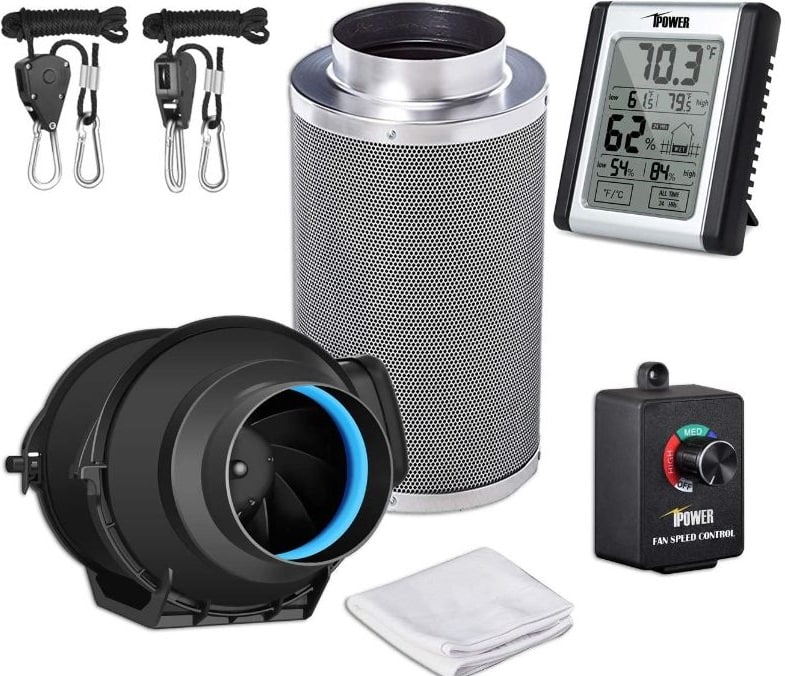
iPower GLFANXEXPSET4CHUMD 4 Inch 118 CFM
- Inline Filter with Fan Speed Controller
- Temperature Humidity Monitor Grow Tent Ventilation
- measures humidity from 10% to 99%
Inspecting Ventilation Ductwork
The ducting that distributes air throughout the grow room needs periodic inspection to check for leaks, obstructions, and detachments. Small leaks reduce system efficiency. Obstructions limit airflow.
Visually inspect ducting for any loose connections, gaps, kinks, or damage. Use smoke or other leak detection methods to identify less obvious leaks. Repair any issues and ensure ducting connections are tight and properly sealed. Replace any damaged sections of ductwork.
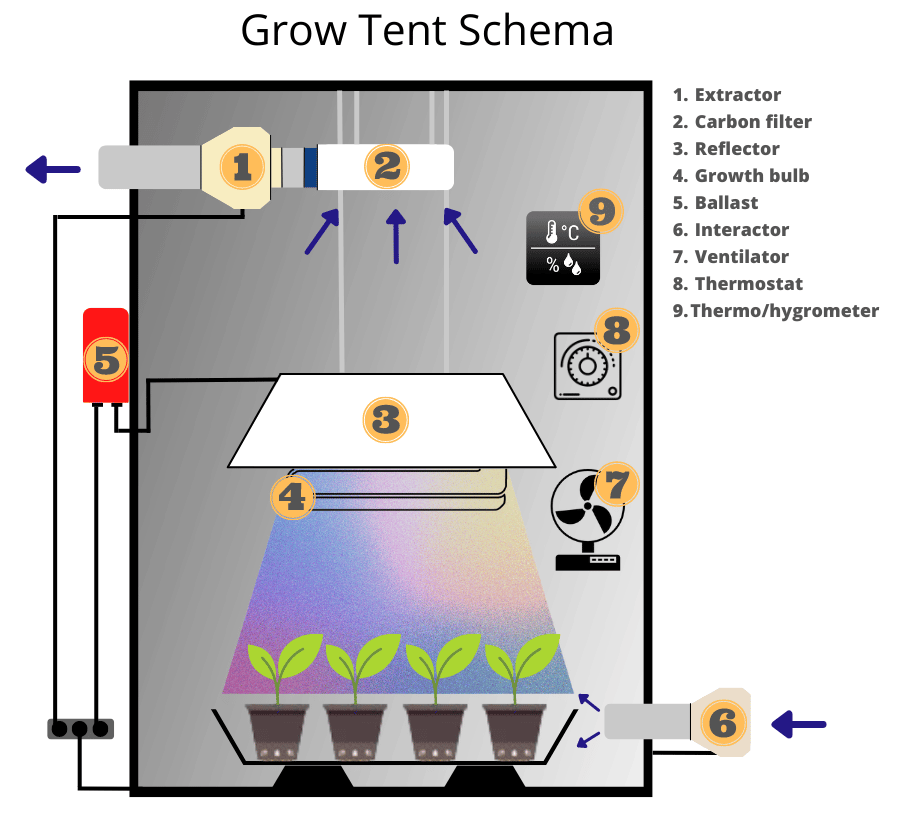
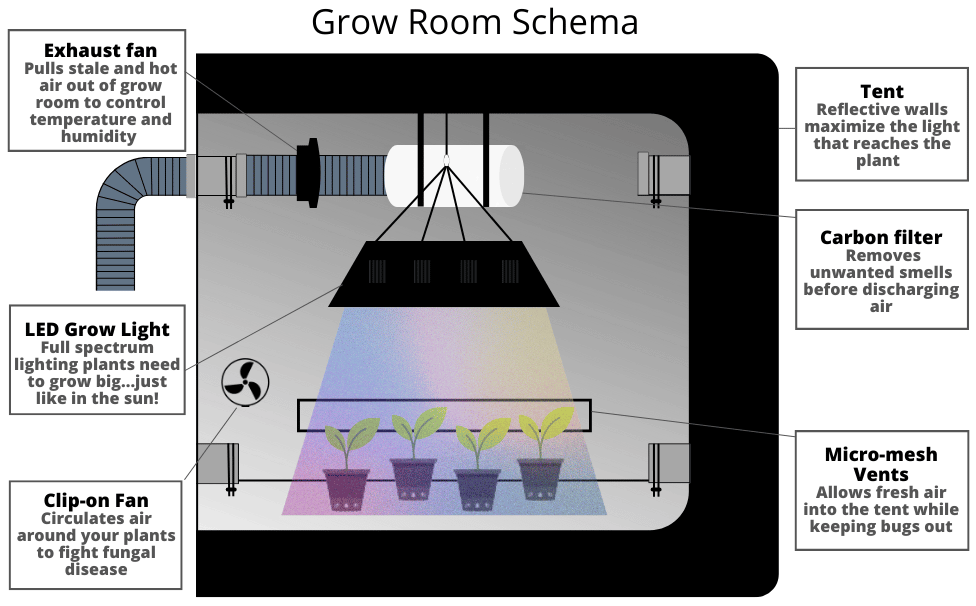
Img: Grow Tent Ventilation Diagram or Complete Grow Room Schema with ventilation, lighting, thermometer, timer, and control unit
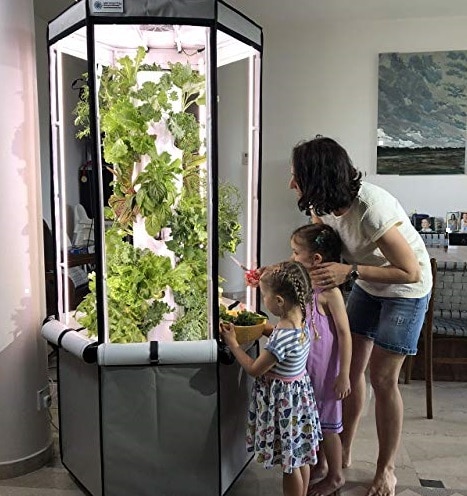
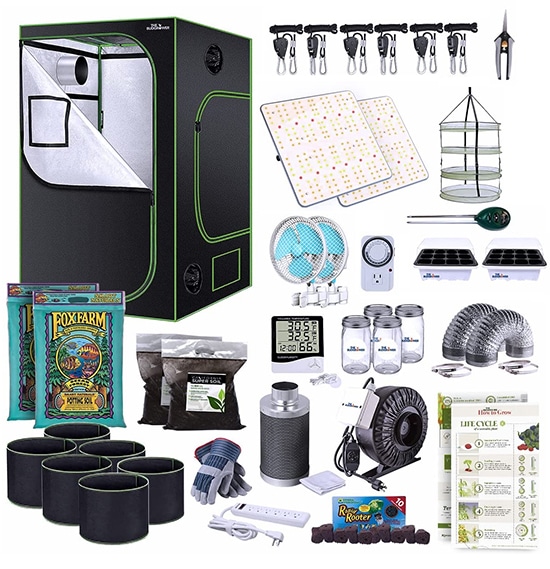 TheBudGrower Complete All-in-One Home Grow Solution 4x4x7ft- 2200W(2)
- LED lights specialty manufactured by VIVOSUN with Samsung LM301 diodes for FULL spectrum light
- The industries most durable grow tent – heavy duty 1680d oxford cloth
- Money & energy saving complete home grow tent kit
Common Issues with a Grow Tent Ventilation System
Maintaining ideal growing conditions in a tent requires an effective ventilation system. However, problems can arise that negatively impact the environment and plants. Diagnosing and correcting these issues is crucial. Here are some of the most frequent ventilation system problems tent growers face:
- Managing high temperatures. Elevated temperatures are a common issue caused by inadequate ventilation, undersized fans, or too much grow lighting. Symptoms are wilting, drooping, and heat stress. Check that fans are running properly, and air intakes are unobstructed. Open vents fully, add more fans to improve airflow, or upgrade to a larger fan if needed. Reduce lighting intensity or raise lights higher to decrease heat.
- Controlling high humidity. Excessive humidity is often from low air circulation and ventilation. Poor drainage can also raise humidity. Increase fan speed and airflow to lower humidity. Use a dehumidifier to actively remove moisture from the air. Improve drainage in the grow area and avoid overwatering. Reduce plant density if the tent is too crowded.
- Dealing with low humidity. Low relative humidity can result from excessive ventilation, drying out the air. Look for low humidity symptoms like curled or crispy leaves. Partially close vents and reduce fan speed to raise humidity. Install a humidifier to add moisture back into the air. Group plants together to create a microclimate.
- Eliminating odors. Unwanted odors can occur when a filter is undersized or exhausted. Check for filter bypass or exhaustion by smelling the exhaust air. Replace old filters with a larger capacity model. Add another filter in series, or switch to a higher quality filter designed for odor control. Ensure proper ducting connections.
- Correcting insufficient airflow. Inadequate airflow through the tent leads to stagnant, poor quality air. Check for obstructed vents, collapsed ducting, and clogged filters. Clear any blockages and clean or replace filters. Use smooth ducting without sharp bends. Upgrade fan size if necessary to reach desired CFM rating.
- Managing pest and pathogen outbreaks. Pests and pathogens can spread rapidly in the closed tent environment. Improve ventilation filtration to filter out pests and spores. Sterilize the grow area thoroughly. Isolate and remove any infected plants. Introduce beneficial predator insects or apply appropriate pest treatments.
- Handling equipment failures. Fan failures, collapsed ducting, and other equipment issues can disrupt ventilation. Have backup parts and replacements on hand. Monitor devices closely and perform preventative maintenance. Create redundancy with additional or larger capacity fans. Invest in durable, long-lasting equipment.
- Adjusting for seasonal changes. Ventilation needs to fluctuate with changing outdoor conditions between seasons. In winter, reduce ventilation and close vents to retain heat. Add a heater if necessary. In summer, maximize airflow and exhaust hot air with more fans. Adjust equipment and settings to maintain optimum growing conditions.
FAQs
How to choose the correct fan size?
To choose the correct fan size, calculate the required CFM (cubic feet per minute) for your grow space based on its size, plant count, and environmental goals. Select a fan with a max CFM rating at least 10-20% greater than your calculated requirement. This provides a safety margin to account for restrictions. Oversized fans waste energy, undersized ones can't maintain proper conditions.
Is direct outdoor ventilation an option?
Direct outdoor ventilation is risky since it provides no filtration or climate control. It exposes plants directly to molds, pests, and fluctuating conditions. It should only be used with small-scale operations. For most grows, intake air should be filtered and conditioned before entering the growing environment via ducting.
What is the recommended carbon filter replacement frequency?
Carbon filters should be replaced every 2-4 grow cycles, or around every 12–18 months. Old filters become saturated with odors and lose efficiency. Check by smelling exhaust air — any odor indicates it's time to change the filter. More frequent replacement is needed for heavy use or high odor strains.
Is an intake fan necessary with passive air intake?
A passive intake does not require a fan. The differential air pressure created by exhaust fans pulls fresh air in through passive vents and shafts. However, passive intakes provide less airflow control than powered intake fans. Intake fans give the ability to balance and adjust airflow rates.
What are the best methods for climate control?
The best climate control methods are adjustable speed exhaust fans, thermostats, and automated environmental controllers. They maintain ideal temp, humidity, and CO2 levels by regulating equipment based on sensor readings. Freestanding ACs or dehumidifiers can also be used. Avoid direct humidification.
How can airflow be improved in grow tents?
To improve airflow in grow tents, use larger smooth ducting, reduce bends/kinks, upgrade fan capacity, filter intake air, exhaust hot air efficiently, and evenly distribute plants to avoid dense pockets. Negative pressure and sealing tents also improves airflow dynamics.
 BLOOM PLUS LED Grow Lights, BP 2500W 2X4ft Coverage Grow Light Use with 646packs Samsung Diodes(Includes IR)
- For Indoor Hydroponic Plants Seeding Veg and Bloom
- Dimmable Sunlike Full Spectrum Plant Grow Lights
- 30-day money-back guarantee and a trusted 3 years warranty
Leave a Reply