Hydroponics at home may sound crazy if you’re unfamiliar with the concept. However, it is a soil-free method of plant cultivation where the roots obtain nutrients from a blend of water and a solution that contains all the essential elements required for plant growth, including an air supply. Numerous hydroponic techniques are available for growing plants in a home setting, and we will discuss a few of them using examples.
Sit comfortable and prepare well because there will be several step-by-step tutorials:
- A general one;
- For tomatoes;
- For strawberries;
- And for lettuce.
We also combined some of the most useful recommendations for your success. You can find them after the tutorials.
Whether you’re a newcomer or a professional in hydroponics, these tutorials will be easy to understand and use!

How to Grow Hydroponic Plants: A Step-by-Step Guide
From my experience, it follows here, we’ll review a major step-by-step on using a hydroponic system to grow almost anything. After that, we’ll focus on particular plants.
What You’ll Need
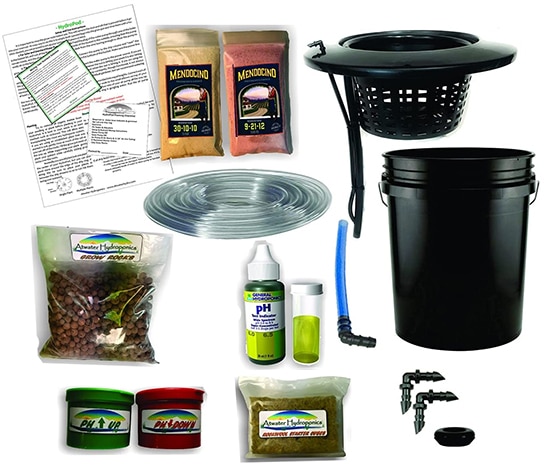
In my opinion, the tool and material list include:
- A garden hose;
- A bucket;
- A nutrient solution;
- A pH control kit;
- An aeration system;
- Seeds or seedlings;
- Plant clips;
- 50-gallon container for water and nutrients;
- PVC pipe.
- Easy to use aeroponic system for your home
- Fan - Grow Lettuce, Herbs, Veggies & Fruits
- Grow smart & eat healthy, 20 gallon water reservoir Grow Tent, LED Grow Lights
Step 1: Choose the Proper Location
The location of your hydroponic system is very important because plants will need a certain temperature to thrive. A basement or a greenhouse should work out very well. This has to be an enclosed location with sufficient space for all the equipment, so consider the scale of your planting.
Make sure the floor or the ground is even at all places where the buckets will be placed. This ensures even water supply to every plant. You will also need growing lights for the best results.
If outside is the only option, install protective equipment to secure the location from wind and extreme temperatures. Check the water levels more often because the evaporation might increase during sunny, warm days. Try to find space inside during the cold seasons.

Step 2: Install the Hydroponic System
Here’s what you’ll have in the system package:
- 6 (or a variation) growing PVC tubes;
- A PVC stand;
- PVC trellis;
- A nutrient container (50 gallons)’
- A pump;
- A manifold.
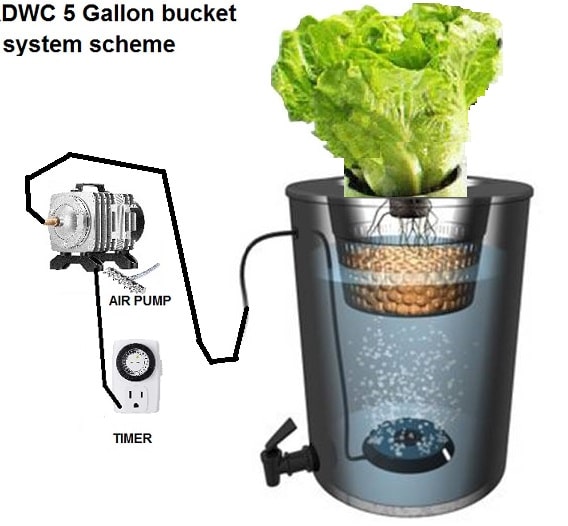
The nutrient container is placed under the growing tubes, with a pump inside. The latter will push the water with the nutrient solution to nurture the plants. Every tube has a drain pipe connected to it and the container.
The manifold is on top of those drain pipes. Such a construction creates enough pressure, and the water moves freely wherever it should. Nutrient solution and water spray the roots of your plants, feeding them, and the water gets oxygenized due to the jet that’s created as a result of pipe system work.
Such a DWC construction is money-saving because you don’t need to aerate the water with additional tech. There are many other variations where you will need that technology to make sure your plants get enough oxygen along with the nutrients.
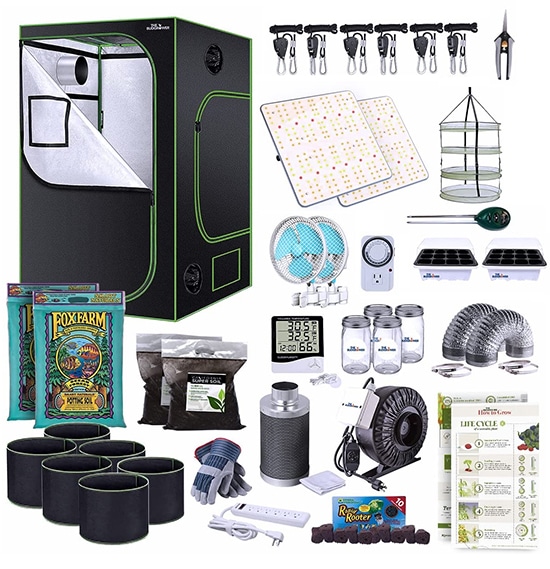
- LED lights specialty manufactured by VIVOSUN with Samsung LM301 diodes for FULL spectrum light
- The industries most durable grow tent – heavy duty 1680d oxford cloth
- Money & energy saving complete home grow tent kit
Step 3: Mixing Nutrients in the Container
This is the easiest step if you know the proper ratio of nutrients. The benefit here is that if you buy a ready-to-use solution, there’s no need to mix elements in certain ratios to feed the plants. And the instructions are very clear, written on the label. All you have to do is fill the container with 50 gallons of water and add as many cups of the solution as the manufacturer recommends. Usually, it’s 2 cups, but make sure to check the label for information.
Then, turn on the pump and let it mix your “potion” for about half an hour. This will allow for thorough mixing.
Step 4: Placing the Plants
It’s much easier to buy seedlings instead of seeds or grow them on your own beforehand. This is quite time-consuming, but if you want to be there for the whole process, go for it.
Choose the healthiest plants, inspect them for root integrity and overall condition. It’s important to remove as much soil from them as you can before placing them in the tubes. The best way to get rid of the soil is to put your plants in lukewarm water for some time. Don’t use hot or cold water, as the young plant might get shocked by it. Carefully work on the roots to remove any soil and debris, as later it may clog the water spray, ruining the whole process.
Put clean pants in the planting cups, getting as many roots as you can through their bottoms, so they are completely open to the nutritious solution jets. To keep the plant in position, add clay pebbles or another fine type of media. Choose something that isn’t too heavy; the roots are very young and fragile.
Step 5: Using Plant Clips to Position Them
Tying such young plants might be difficult, so do it lightly and carefully. Tie the string to the trellis, and attach plant clips and string to every unit, winding the grown parts around them. Such a construction will help them grow straight up and save space.
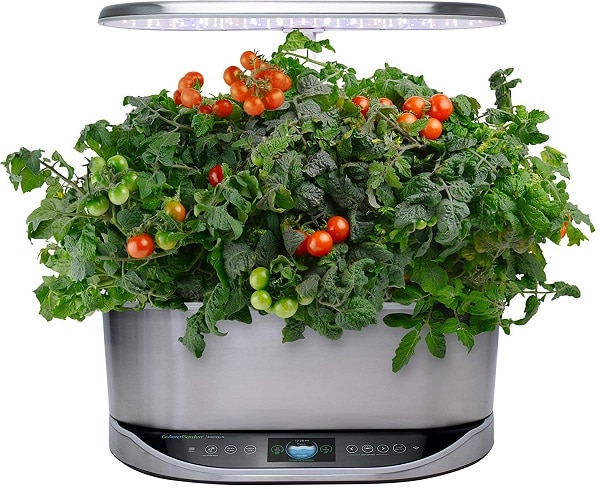
- WiFi and Alexa Compatible, Stainless Steel Grow up to 9 plants, up to 24duim
- Includes everything you need to grow
- 50 watt LED Grow Lights, perfect spectrum for fast growth & big harvests
Step 6: Start the Process
Start the pump and wait for wonders. We recommend checking on the system every day at least once or twice, making sure the water levels are OK, the temperature isn’t too hot or too cold, etc. See how much water evaporates on average and refill the container with the mix when necessary.
It’s also important to check pH levels; there are special kits for controlling them. The pump doesn’t need much maintenance, except for making sure it’s always submerged in water. If it runs without the water, you may lose the pump and the whole construction.
Step 7: Monitor the Growth and Protect the Plants from Disease
After a few weeks, your plants will be fully grown, and you can experience up to a 50% acceleration in growth rate due to the roots having direct access to all the necessary nutrients, water, and oxygen. It is recommended to inspect the structure and adjust the position of ties or clips as necessary to allow for plant growth.
It’s also recommended to inspect your plants for diseases and pests. While the DWC systems usually provide enough protection by being almost fully closed, there’s a chance of contamination. One sick plant can easily transfer the disease to the rest, so if you notice one, remove it as soon as possible.
Hydroponics is very beneficial when it comes to pests and plant diseases. The plants don’t spend a lot of time growing since they don’t have to look for food. This makes them healthier from the very beginning. Besides, the leaves don’t get wet, which means a lower risk of getting fungus, mold, and mildew.
As to bugs, try to remove them from the plants as they may damage them, finding small holes in the system to gain access.
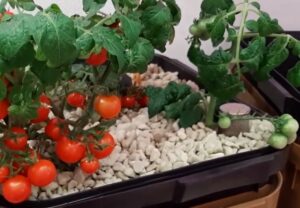
How to Grow Hydroponic Tomatoes
First of all, we’d like to repeat that hydroponics works best with seedlings. Growing a plant straight from the seed is more suitable for a conventional soil-based method. Doing so using hydroponics will take a long time. So, the first step is to get tomato seedlings.
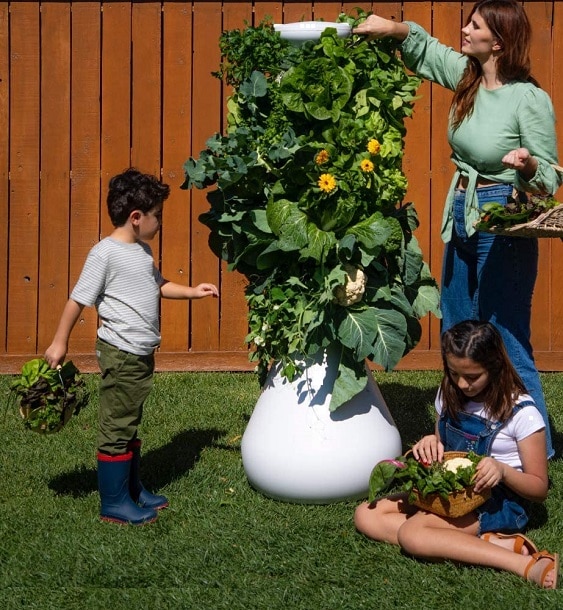
- Large Home Organic Gardening with Self Watering with Pump, BPA Free and Food Grade
- Outdoor Indoor Vertical Garden Herb Vegetable Planter Tower
- All the gear: farmstand tower, water pump, power cord, timer; and Nutrients for 130+ Plants
Then, you need to learn more about the plant you’re about to grow. Tomatoes are a part of the fruit family. And all of us have at least once tried a stale, dehydrated fruit, which isn’t a delight. So, learning about what fruit needs to thrive is a must-do! If you do everything properly, but without knowledge about tomatoes, the result might not be satisfying.
If it’s your first project, opt for leafy greens or other plants that don’t require so much care. And when you’re ready to go to a new lever, proceed to grow tomatoes. If you want to do it now, let’s gain some knowledge!
Things to Avoid When Growing Tomatoes
Don’t buy outdoor-grown seedlings. Period.
While lots of shops claim they sell indoor-bred seedlings, this might not be the case. Find a seller that is reliable and honest, or grow the seeds yourself inside the house. Outdoor-grown varieties may be contaminated with diseases that will make the whole process a waste of time and money.
Growing a sapling inside your own house isn’t too difficult. You will need:
- Healthy seeds;
- A tray to put them onto;
- A pH control kit;
- Rock wool or perlite.
Perlite is a more affordable option, but rock wool works well specifically with tomato seeds. You can also opt for a mixture of both to optimize the use and the budget. Germinate the seeds in the mixture with water (pH 4.5, check it regularly) on the tray.
As soon as the seeds turn into seedlings, you can proceed to installing your hydroponics system and starting the growing process. Growing tomatoes is different than growing other plants, and there are a lot of methods you can use to succeed. They are described in books by Jack Ross, Howard M Resh, and other writers.
Beware the nutrients! Tomatoes will need the following “food”:
How to Grow Hydroponic Strawberries
Strawberries open the world of hydroponics fully for you. There are a lot of systems that can be used for the plant, including deep water culture, ebb and flow, drip irrigation, nutrient film, wicking, aeroponics, etc. The reason for such versatility is a relatively small root system of a strawberry plant.
The deep water culture system, which is widely popular, is more suitable for larger spaces and quantities of strawberries. If you have limited space at home, we recommend trying another system, for example, wicking. It’s as suitable for beginners as the DWC system; plus, you don’t need a water pump or any complicated constructions.
What You Need
Here’s what you’ll need:
- A container for the nutrients (5 gallons is fine);
- A container or pots for every plant; choose whatever can be fixed on top of the nutrient reservoir;
- Wicks (strips or strings of cotton, wool, nylon, etc.);
- A suitable growing medium that provides sufficient drainage and aeration;
- Nutrient solution;
- Runners or roots (if using roots grown in soil, make sure to clean and disinfect them properly).
The step-by-step is quite simple:
- Soak the growing medium for half an hour in water with a balanced pH and put it in the growing container or pots, filling about ⅔;
- Mix water with the nutrient solution. Check the mix for EC (electrical conductivity) and pH;
- Clean the wicks of your choice in water with proper pH;
- Connect the medium in the growing container or pots with the nutrient reservoir using wicks. There should be two wicks per pot, and if you’re using one container, make sure there are more than 3 wicks;
- Put the system on top of the nutrient tank and make sure it stays secure;
- Put runners in the container or pots, distributing the roots properly in the growing medium, and add some more medium on top but make sure it doesn’t cover the whole plant;
- Check on the system every day to see the levels of pH and EC and compensate for the nutrient mix evaporation;
- Water the growing medium once a week to make sure there’s no excess mineral buildup;
- If growing indoors, install growing lights for the best result. If growing outdoors, make sure there’s enough sunlight for the plants;
- When your strawberries start to bloom, pollinate them lightly using your fingers;
- When the fruits get really red, it means they are ripe and ready for harvesting. Remember that after you pluck a strawberry, it stops ripening;
- If you need more runners for the next setup, use clippers to remove them from already grown plants;
Strawberries are great to grow at home because you can do it no matter the season, using such an easy hydroponics setup.

How to Grow Hydroponic Lettuce
Growing lettuce hydroponically is the best way to start. The plant is beginner-friendly and will forgive you for minor mistakes. As to the method, it depends a lot on your growing needs. You can use:
- A DWC system.
Deep water culture systems are classic. They are great for large commercial projects, but small versions are also used by home growers. You need a water pump and an aerator for most models to provide enough oxygen for the plants. There are both bought and DIY constructions that people use at homes. The amount of water in these systems is large, which prevents dramatic temperature changes, as well as major fluctuations in EC and pH levels. - A nutrient-film technique.
This is a more expensive technique that allows plants to grow in small channels. The roots are fed with a thin film filled with nutrients. It’s circulating constantly, and the excess water drains due to the sloped position of the channels. The water flows back to the reservoir, where you can control the portions of nutrients, pH levels, and temperature. The system is quite complicated, so if you’re an amateur home lettuce grower, there are easier and less expensive options for you to try. - The ebb and flow method.
Ebb and flow systems are also called “flood and drain.” As the name implies, the water with a nutrient solution floods the roots of your lettuce or other plants and drains back to the main reservoir after that. Both processes are done one by one, at suitable intervals. The solution can be regulated and updated in the main tank, as usual. - The Kratky method.
This is the easiest method of deep water culture hydroponics. The difference is that the system is completely passive. You don’t need air or water pumps for it. Plants are submerged in a mix of water and nutrients, and aeration is done naturally. This is a great method for beginners, especially if you’re growing lettuce.
The actual step-by-step is the same as in the main section of this article. If you choose another system, the user manual should contain information about a particular model and its usage. But, as you can see, most systems work using the same algorithm: the water with nutrients is channeled to the roots of your lettuce and circulates or drains.
- Most efficient use of water compared to traditional gardening
- Dual outlet air pump, Nutrients are Included!
- Kit contains everything you need to start your own garden (minus plants and water!)
How to Grow Hydroponic Lettuce from Seeds
Again, it’s best to use hydroponics to grow plants from seedlings. But you can do it at home before installing and using your system. You can grow in soil, water, etc., or using the method of your choice. Buying from other growers will also work if you’re sure the seedlings you get are healthy.
Then, you’ll have to do the same steps mentioned above and grow healthy, delicious food, or a gorgeous garden.

How to Grow a Hydroponic Garden: Pro Tips
From my experience, it follows here are some additional tips for you to consider before and during growing hydroponically:
- Make sure you know the whole list of equipment you’ll need, including pH and EC controlling devices;
- Learn about the requirements of the plants you want to grow. Different kinds will need different nutrition and temperature;
- Find out more about the amount of light the plants need and control it by covering the construction or using growing lights for a certain amount of time;
- Only use professional nutrition solutions. There should be three components: micro-nutrients, meso-nutrients, and NPK (Nitrogen, Phosphorus, Potassium (K);
- Don’t pick additional nutrition if you’re a beginner and have little knowledge about the extra nutrients your plants might need for faster growth;
- Write a plan of maintenance (checking the water, pH, EC levels, adding nutrition, etc.) and stick to it, especially if it’s your first project;
- Consider having everything necessary before assembling the system so that you can fully focus on the process and follow every step properly;
- Move your outside garden inside if the temperature drops below 55F. If there’s an AC (air conditioner) for outside use, you can utilize it without moving the plants. But keep in mind that it will require additional spendings;
- While most plants will need light, the nutrients don’t, so make sure the solution isn’t exposed to sunlight for a long time;
- Prepare ahead and have an extra tank with clear pH-controlled water for the next change of the nutrient solution. The change should occur every 2-3 weeks;
- Maintain a proper dark period and make sure it’s not interrupted, so you don’t shock the plants. Digital timers work great for that;
- Maintain, clean, and sterilize the system regularly;
- Before adding new plants to the complex, quarantine them for 14 days to make sure there are no diseases in them. Even one sick plant may ruin the whole row;
- Don’t let pets to your garden, and change clothes and take a shower after you’ve been outside or in another garden to minimize the risk of contamination;
- Protect your air intake systems with filter screens.
There are several tips that can help minimize or eliminate the risk of contamination in your garden. By following these tips, you can ensure that every plant in your garden is healthy and happy.
Conclusion
In my opinion, hydroponics presents a relatively inexpensive and simple approach to cultivating plants rapidly and with reduced risks. It is worthwhile to consider trying it out if you have some extra space in your home, and it could potentially become a new hobby for you!
There are lots of guides online that will teach you to use any type of system to grow anything, from beginner-friendly lettuce to tomatoes that require some experience.
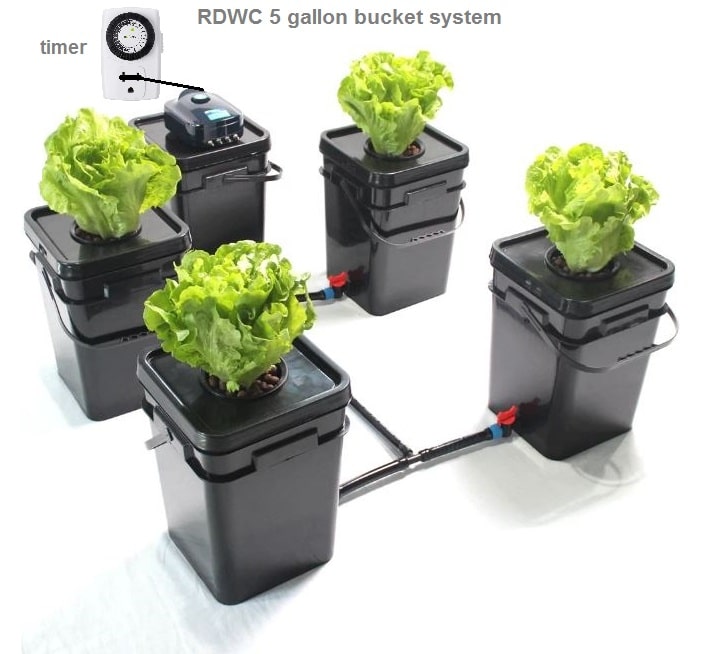
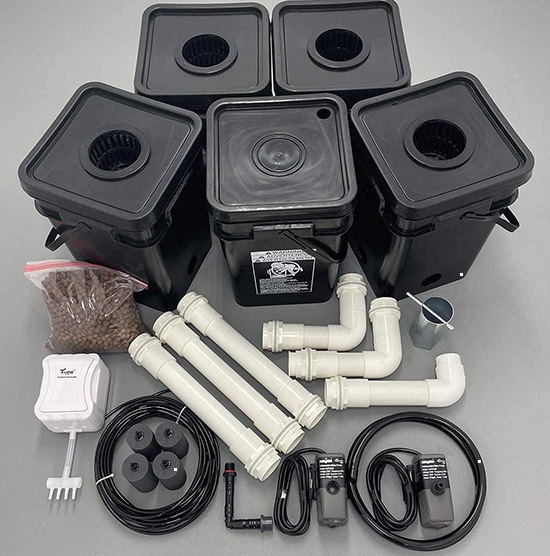
- Reservoir Bucket Connected to 4 Grow Buckets
- 400 Gallon/hour Circulating Pump
- Large 5 gallon square buckets, pre-drilled
But first of all, let us know if you’ve enjoyed the article. Are there any questions? What’s your hydroponic experience? Maybe there’s something you’d love to add to the recommendations section. We’ll be happy to read your comments! And make sure to share the article with your friends!
Happy Growing!